Tag Archives: Homebrew

3D Printing a Raspberry Pi Case

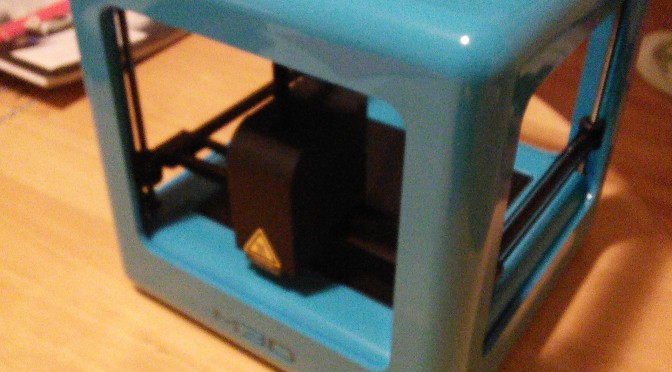
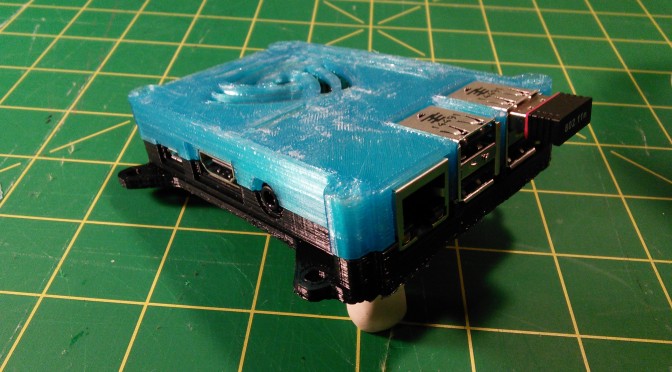
In a previous article, I wrote about jumping into 3D printing for fun and home-brewing.  I decided I wanted to try printing a custom case for my Raspberry Pi 2 Model B that I found on Thingiverse.  I chose one that had VESA mounting tabs with 75mm spacing in order to mount to the back of an older LCD monitor I had laying around.  I am doing this to create a dedicated computer for running my M3D 3D printer.

Raspberry Pi Case
Custom Cases for Raspberry Pi found on Thingiverse.com

I’m printing the case you see above on the left.  There are other upper case options for mounting mini-fans should you need to provide extra cooling for your Raspberry Pi.  And if you are handy with one of the many 3D modeling software packages out there, you can mod this case (or any case) to fit your specific needs.

PRINTING THE CASE LOWER

I acquired a spool of black PLA filament (Hatchbox) from Amazon.

3D Printer Filament

While not specifically branded by M3D, I wanted to try other sources because the Hatchbox brand was less expensive on the order of 2.8:1 than the M3D branded filament.  I was taking a chance because I am learning that getting the temperature right for a brand not tested by the printer manufacturer can be tricky.  I did have issues of the print starting to lift off the print bed (M3D is non-heated).  But I recovered from that by tacking down the corner with a hot glue gun.  Maybe this would have printed better on a heated print bed or if I would have controlled the surrounding temperature better.

Almost completed lower Raspberry Pi cas
Almost completed lower Raspberry Pi case
Completed Raspberry Pi case lower


Back of case showing "raft" before removal and cleanup
Back of case showing “raft” before removal and cleanup


Cleaned up lower ready for test fit


Fits like a glove!
Fits like a glove!

PRINTING THE CASE UPPER

Given the experience I had with printing with the Hatchbox filament, I wanted to see how printing the case upper would be using the M3D filament.   I just chose one of the other M3D filaments to contrast the black lower.  The printer’s program calculated this to be a 14 hr print.  But, the output is looking good for far–no lifting of corners or warping.

Printing the Upper Case Printing The Upper Case

About 12 hours later… DONE!

Print completed for the RasPi case upper


After removing the raft and cleaning up stray flashing
After removing the raft and cleaning up stray flashing (inside)


After removing the raft and cleaning up stray flashing (outside)


Fits great!  Just need to figure out the case screws.

As mentioned earlier, I wanted to print the case version with the VESA mounting tabs on the back of a monitor.  In this case, they needed to be 75mm spacing.  Aligned nicely!

Final Assembly Final Assembly

This was a fun project.  While not a perfect printing experience, it was good enough for a first major print project.  Lessons learned will be turned back into the printing experience and improved upon on subsequent projects.

After mounting this Raspberry Pi w/case to the back of the monitor, the next mini-project is to get the Raspberry Pi working with the 3D printer.  There appears to be groundwork already done in this area, and I will follow the path already paved.

Wayne / AG1A

Inexpensive DIY Digital Oscilloscope Kit

I came across a DSO138 DIY Digital Oscilloscope Kit (SMD Soldered Version) on the Internet recently that looked like a fun project for the kids and me to work on together.  The price didn’t seem bad at $24 w/free shipping.  I ordered the optional clear acrylic case to go with it for another $7.50 more.

Basic specs (from the supplier site):

  • Maximum real-time sampling rate: 1Msps
  • Accuracy: 12Bit
  • Sampling buffer depth: 1024 bytes
  • Analog bandwidth: 0 – 200KHz
  • Vertical Sensitivity: 10mV / Div – 5V / Div (1-2-5 progressive manner)
  • Adjustable vertical displacement, and with instructions
  • Input impedance: 1MΩ
  • Maximum input voltage: 50Vpp (1: 1 probe), 400Vpp (10: 1 probe)
  • Coupling modes: DC / AC / GND
  • The horizontal time base range: 10μs / Div – 50s / Div (1-2-5 progressive manner)
  • With automatic, regular and one-shot mode, easy to capture the moment waveform
  • Available rising or falling-edge trigger
  • Adjustable trigger level position, and with instructions
  • Observable previous trigger waveform (negative delay)
  • Can freeze at any time waveform display (HOLD function)
  • Comes with a 1Hz /3.3V square wave test signal source

It came in the mail this weekend.  In the box was the case kit, bag of parts, main board, display board, test cable, assembly checklist, and a basic how to use guide:

Oscilloscope Kit

Oscilloscope Kit Oscilloscope Kit

Oscilloscope Kit Oscilloscope Kit

Oscilloscope Kit Oscilloscope Kit

Oscilloscope Kit Oscilloscope Kit

I plan to post updates on the build experience with photos along the way.  Stay tuned!

Wayne,  AG1A


3D Printing for Fun and Homebrewing

I recently picked up a mini 3D printer made by M3D.com because I wanted to channel my inner-maker and see what it was like to dabble in 3D printing, but I didn’t want to spend the $1k-$2k or more for trying out something that I might not like.

This particular printer has a capability of printing objects up to 5.9″ x 5.9″ x 5.9″ in both PLA and ABS.  It is not the fastest printer out there, but with a little patience and sub $400 prices, I was willing to give it a try.

3D Printer

After unpacking the printer and settling on the white filament for my first dive into 3D printing, I looked for something that was simple, small, and easy to print.  I picked a flop-eared bunny for one of my daughters for Easter.  I pulled this 3D model from a well-stocked source of 3D models called Thingiverse.

3D Printer Widget

It was easy to get the printer up-n-running.  Here is a sequence of photos during the 4-hour process with the final image being the bunny with all raft and supports removed.

3D Printer in Operation 3D Printer in Operation 3D Printer in Operation 3D Printer in Operation

Now that I got thru my first successful 3D print.  I started thinking more of what can I print that might be practical and useful?  I know I have always wanted something to keep my charging cords from falling behind a desk or nightstand, so you can print these:

3D Printer Cables

And how about a nice custom case for that new Raspberry Pi you recently got?  Or custom printing some other little project box?

Raspberry Pi Case made with a 3D Printer

There are many helpful projects you can print that already exist on the Internet and many colors to choose from.  Want to strike out on your own and brew your own custom widget?  Here is a chance to learn 3D modeling and there a quite a few freeware versions of software to choose from.   I recommend going to a site like 3D Printing for Beginners for starters.  There appears to be quite a bit of info on this site to keep you busy in learning about 3D printing.

Wayne, AG1A

Radio Amateurs Developing Skills Worldwide