Well, another month has gone by on my two-band attic Moxon antenna project. If you recall from last month, I was left with a perplexing matching problem with the 15M antenna while the 17M one works fine. I had to figure out how to come up with a way to chase down what was causing the problem. I guess this just proves that there is no such thing as a simple, straightforward antenna project.
So, with a can of suds as brain fuel, I sat down to methodically list what to do and rule out possible causes. As a starting point, I connected a 1:1 balun to the 15M and a no-balun, connection to the 17M beam. This time, I decided to do all measurements from the shack so that losses from the shack coax would be taken into account. SWR checks on each antenna were consistent with earlier measurements, namely an SWR <2:1 on 17 and 15 meters using the 17M Moxon while rising to 4.4:1 – 6.0:1 across the band when switched to the 15M beam.
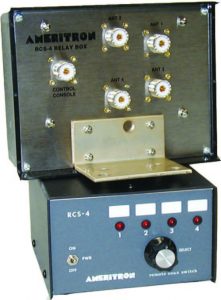
The next step was to rule out any leakage inside the RCS-4 remote switch. I decided to try this step because I was suspicious of the current design of the RCS-4. I had used one for about 20 years in good ol’ NH weather without a problem. The new unit, however, felt light. The relays in the remote unit were too quiet for my liking, and an AC power pack replaced the internal power supply from the old unit. I moved the 17M connection to the last position on the switch so that it was on a separate relay from the 15M antenna and measured. No change. I then disconnected the 15M antenna from the switch, leaving it open, and measured. Again, no change. I connected a jumper across the 15M connector to short the antenna elements together and measured both bands on the 17M antenna. As observed earlier, the 17M beam works fine on both bands, indicating the 17M Moxon does not see the 15M one.
OK, so now what? It was clear the 15M beam was being influenced by the 17M one. I decided to check the phasing between the two beams wherein the center and shield sides of the coax were connected to the respective sides of each beam. The casual observer will recall a demonstration by Dale, AF1T of what happens when stacked beams are fed in-phase or out-of-phase. However, since I’m operating on two different bands, why do I want to do this? The answer: electromagnetic behavior is complicated; just ask J. C. Maxwell.
To do this, I connected a center insulator that has an integrated PL-259 connector to the 15M beam. I had used this connector in the past and it was already marked for the shield and center conductor sides. I checked the balun connections that I had removed from the 15M beam, found the shield side on the first try, and marked it. I installed the balun on the 17M beam which now represented the opposite of the previous antenna connections. My rationale for doing this was that a direct, non-balun connection showed a good match on 17M.
Measurements from the shack on the 15M beam now showed an average SWR of ~3.3:1 across the band, better than before but not great. Measurements on the 17M beam when tuned to 15M, however, were clearly worse with an average SWR of 4:1. Measurements on 17M were also degraded with the SWR above 2:1. Clearly, the antennas were not happy with this arrangement. I decided to disconnect the 15M beam from the RCS-4 switch based on the noticeable change observed on the 17M beam, and remembering that the 17M beam did work before on 15 meters. When I tuned the 17M beam across 15 meters, the SWR jumped to 8:1. I was now suspicious of what effect the balun was having on antenna behavior. Why should the performance be significantly worse with a balun when compared to the simple split feed of the center insulator?
I pulled the insulator and the balun off the antennas to check the connections again. I was surprised to find that the center insulator showed an open-circuit for the center conductor side. Even more surprising was the fact that the balun showed the same thing, meaning NO CONNECTION to one side of each antenna. I looked at the lugs for each device where the center conductor was and noticed that they were loose. Furthermore, the PVC plastic around each lug had been melted from my efforts to remove old wire and solder from the lugs. Murphy, you struck again!
In desperation, I took a hacksaw to the top of the center insulator connector to check the center wire inside. I found it to be intact so I then removed the eye-bolt and replaced the lug with a new one. The connection to the PL-259 center conductor now worked. I could re-use the “topless” insulator since it would be in the attic and not exposed to rain. I scrutinized the same lug on the balun and figured the melted PVC plastic, as in the case of the center insulator, must have formed an insulation between the lug and the eye-bolt to the balun center conductor. I scrounged around the junk box and found another PL-259-equipped center insulator I could use.
I trudged back up to the attic and reinstalled the center insulators on each beam and scrambled back to the shack to measure things. This time, SWR for the 17M Moxon was flat across the 17M band vice over 2:1 before. Performance on 15 meters for the 17M beam was now down to 2.2:1 which was certainly better than 8:1. The 15M Moxon, however, still showed slightly greater than 3:1, indicating some interaction was still going on, or still a mismatch. Now what?
As I pondered what could be happening, I remembered something about RF chokes around the coax jacket to prevent common-mode interference. I recalled my education about rejecting common-mode interference from a presentation by Chuck, W1HIS, aka, Doctor “Ferrite”. Chuck is the de facto High Priest of Common-Mode Exorcism to prevent RF from entering the shack via feed lines and anything else that comes into the shack. (By day, Chuck is an MIT professor emeritus. The Dr. Ferrite title has been bestowed upon him for his prolific use of ferrite chokes throughout his house. He hates RF noise.)
Admonishing my transgression, I grabbed a couple of ferrite cores from my junk box and scurried up to the attic. I wrapped as many turns as possible of the RG-8X coax line from the shack until there was no more slack on the attic floor. I also wrapped a few turns of the coax from the 15M Moxon around a core. Sadly, there was no change when I checked each beam from the shack. Well, at least I was relieved that I did not appear to have RF sneaking back into the shack and playing tricks on me.
OK, what next? As I pondered what to do it occurred to me that the antennas were fed in-phase wherein the shield side of each antenna was the same. The logical next step was to feed them out-of-phase. I removed the center insulator for the 17M Moxon and reversed the leads so that the coax center conductor was now under the shield side of the 15M Moxon. A sweep of the 17 and 15-meter bands while feeding the 17M Moxon showed an SWR under 2:1 for each band. Switching to the 15M Moxon and sweeping the band still showed the perplexing behavior of SWR greater than 3:1. I did a sweep of several MHz above and below the 15-meter band to determine if the 15M Moxon might be resonant elsewhere but it was not.
Well, at this point it looks like I can operate two bands with the 17M Moxon so it is not a total loss. I am back to where I started in terms of performance of the antennas except the flaky balun is gone for 15 meters. I checked how the EZNEC pattern looks when operating at 21 MHz with the 17M antenna and it does not look much different from 18 MHz. On the bright side, I can always use the tuner in the K3 to make the 15M Moxon play right for the band, giving me some flexibility if I can hear a station better on one antenna than the other. Like I said, the electromagnetic behavior is a complicated phenomenon.
Ed, K2TE


