In this final article of our series on the “Lego-style” antenna for teaching basic antenna physics and behavior, our focus is a Yagi-Uda 3-element antenna for 2 meters. The Yagi antenna is the most common construction form for a “beam” antenna. The Yagi has high gain in one specific compass (azimuth) direction and very low gain in the opposite direction when compared to the classic 1/2 wave dipole. The Directional Forward Gain and “Front to Back” Ratio (F/B Ratio) features are hallmarks of the Yagi and the reasons for its high popularity. The forward gain dramatically increases “Effective Radiated Power” in a chosen direction; the Front to Back Ratio dramatically reduces interference from signals to the antenna’s backside.
BASIC PRINCIPLE OF THE 3-ELEMENT YAGI ANTENNA
The Yagi antenna shown in the Feature Picture above has 3 radiating elements. The center element (with the coax attached) is the “Driven Element” (DE) receiving RF energy from the transmitter. The other two elements are “parasitic”, meaning they are not connected to the transmitter. These elements absorb energy from the DE RF wave and re-radiate it by Faraday’s Law of Induction. This fact gives both parasitic elements a 180-degree phase shift relative to the DE. In the above picture, the left side element is the Reflector, typically 5% longer than the DE; the right side element is the Director, typically 5% shorter than the DE. The length differences make both elements slightly off resonance to the DE RF wave which adds a second phase shift relative to the DE. Finally, the distances on the boom between the DE and parasitic elements adds a third phase shift since it takes a finite time for the DE wave to reach the Reflector and Director. The distance between the DE and the parasitic elements vary between 0.1 to 0.25 wavelengths depending on materials, construction details and design goals for the forward gain and F/B Ratio.
The Yagi secret is that the sum of these three phase shifts for the 3 elements add in a way that reinforces each other for RF energy moving towards the Director. However, RF waves moving towards the Reflector combine in a way that subtracts and leaves little RF energy.
Figure 2 provides an illustration of this action using only waves interacting between the DE and Director, for simplicity.
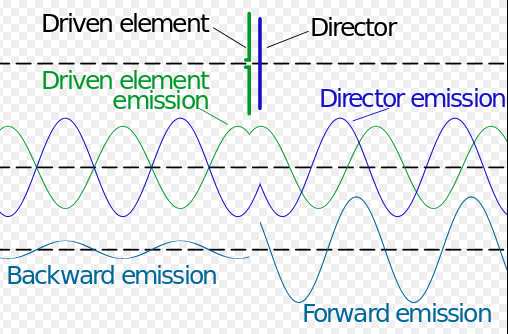 Figure 2. Summing RF wave from the Driven Element with the Induced wave from the Director Element (from Wikipedia, Yagi-Uda Antenna)
The DE RF wave (in green) reaches the Director parasitic element and induces a second RF wave (in blue) by Faraday’s Law. The multiple phase shifts that make up the Director RF wave gives a forward moving emission that adds to the DE wave yielding a combined larger RF wave. However, the Director RF wave moving back towards the Reflector is nearly 180 degrees out of phase to the DE wave and the two nearly cancel each other out. A similar analysis at the Reflector element shows that Reflector waves moving towards the DE and Director also adds to their waves to create an even larger wave. However, Reflector waves traveling off the rear of the antenna subtract with waves arriving from the DE and Director yielding very little RF energy leaving the backside direction of the antenna.
THE TOOLBOX FOR OUR EXPERIMENTS
The top Feature Picture shows the “Lego-Style” antenna in a Yagi assembly and the Lamp Bridge Receiver ½ wave dipole antenna is seen in the upper right corner. The Lamp Bridge Receiver lights when resonant RF is sensed and we used this tool in both Parts 1 and 2 of this article series.
New to our toolbox is a breadboard circuit to measure RF power in a semi-quantitative way using an LED Bar Graph display. The breadboard was built on an Analog/Digital Trainer Module and is seen in the lower right corner. The circuit samples the RF signal received by a 1/4 wave antenna (black antenna seen behind and above the breadboard). The induced RF current is converted to a dc voltage that feeds to a 30-stage linear increasing voltage comparator circuit. A comparator turns on an LED when its voltage threshold value is reached. Our circuit is using only 15 LEDs due to breadboard space limits; however, by skipping every other comparator we are still measuring a 30 fold signal range. The picture shows 3 lit LEDs indicating a sensed voltage that is one-fifth the dynamic range of the circuit.
EFFECTIVE RADIATED POWER: COMPARING THE DIPOLE and YAGI-UDA ANTENNAS
A) BASIC DIPOLE PERFORMANCE
We will use the classic 1/2 wave dipole as the benchmark to assess benefits of the 3-element Yagi-Uda antenna. We begin by measuring relative radiated power of the dipole as we increase transmitter power stepwise between 5, 10, 20 and 40 watts. The power detector circuit consists of a standard 1/4 wave stub antenna connected to the LED Bar Graph RF meter. The results will be used to “calibrate” the detector circuit and be our reference point when we calculate Yagi Gain.
The video below explains the use of the LED Bar Graph RF meter; then it shows the actual testing protocol and you can see the LEDs report received RF signal as we increase Tx power to the dipole.
The results of received RF signal versus transmitter power for the dipole antenna are summarized in Table 1. The data show a close to linear correlation (as expected) within the semi-quantitative limits of the Bar Graph Display.

B) 3-ELEMENT YAGI PERFORMANCE
The next video shows the antenna forward radiated power as we stepwise build the Yagi beginning with the basic dipole; the addition of the Reflector element and a third addition of the Director element. Note, the Tx power is constant at 5 watts. Details of the Yagi construction (element lengths, spacing, etc.) are given in the video.
The data for the RF radiation received with the stepwise addition of elements to assemble the YAGI antenna are summarized in Table 2.

There is a significant increase in antenna forward received signal (looking towards the direction of the Director) as we add the two parasitic elements. The signal increases by 3+ fold with the Reflector over the dipole and then by 7+ fold for the combination of Reflector plus Director. However, we want to translate the results to customary power level values in decibels. The combined data of Tables 1 and 2 let us do this as an estimate of Directional Forward Power.
Gain for 2-Element Antenna in dB:
7 Lit LEDs at 20 watts for dipole and 5 watts for Yagi
dB = 10 x Log(20/5) = 6.0 dB (= 1 S meter unit)
Gain for 3-Element Yagi in dB:
15 Lit LEDs at 40 watts for dipole and 5 watts for Yagi
dB = 10 x Log(40/5) = 9.0 dB (= 1.5 S meter units)
THE FRONT TO BACK RATIO OF EFFECTIVE RADIATED POWER FOR THE 3 ELEMENT YAGI ANTENNA.
A) THE 1/2 WAVE DIPOLE
We begin our experiments on Front to Back received power using the basic 1/2 wave dipole as we did above for forward radiated power. However, since the dipole is symmetric side to side we will label our measurements as “left side” and “right side” to the wire axis. Second, our dipole experiment will use the Lamp Bridge Receiver antenna because we will use power levels not requiring amplification (the LED Bar Graph RF meter has a 10x gain built-in). Also, resetting the LED RF meter at the opposite table end is not easy.
The 2-sided picture below shows the responses of the Lamp Bridge Receiver antenna to a 40-watt transmission. Picture 1A shows the received signal on the left side of the dipole; Picture 1B shows the response on the right side of the dipole.

As you would expect, the radiated power of a basic 1/2 wave dipole appears equal broadside to the wire axis, as we learned in the Technician License Class.
B) The 3-Element YAGI-UDA Antenna.
Our last video has a simple experiment showing the Front to Back Ratio effect of the Yagi antenna for radiated power parallel to the boom axis. We return to using the LED Bar Graph RF meter for the experiment. The study is made easy by the simple trick of swapping placement of the Reflector and Director elements, a benefit of the “Lego-Style” construction of our antenna model.
The study results are striking. The data for the Forward RF signal from the Yagi showed an 8x fold increase over the basic dipole with 15 lit LEDs at 5 watts for the Yagi versus the dipole needing 40 watts to elicit the same response. We also saw this result in Video 2 (compare data in Tables 1 and 2). In contrast, the received Back-Side RF signal gave only 1 lit LED. The difference merits visual repetition with a paired picture display.
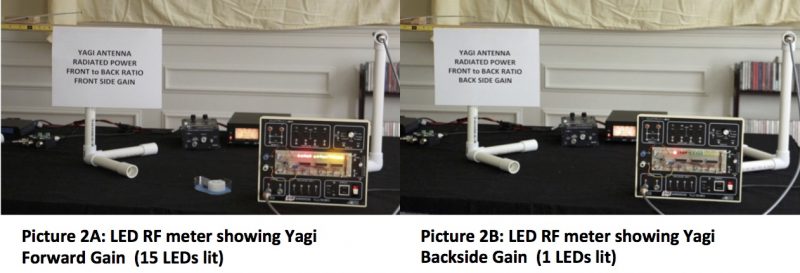
We can transform this data to estimate dB Power Gain of the Back-Side signal in a similar fashion as the Directional Forward Gain. Again, we use data from Tables 1 and 2. However, we need to interpolate the signal response of the Yagi Back-Side signal of 1 LED with the 2 LED response for a dipole at 5 watts. The factor is 1/3, not 1/2. Why? Remember, the RF detector circuit divides the received signal into 30 equal size buckets, but we only look in every other bucket with an LED. Hence, LED #2 measures the third bucket, not the second bucket. I will repeat the Forward Gain calculation here to make the result comparison easier.
Forward Gain for 3-Element Yagi in dB:
15 Lit LEDs at 40 watts for dipole and 5 watts for Yagi
dB = 10 x Log (40/5) = 9.0 dB (1.5 S meter units)
Backside Gain for 3 Element Yagi in dB:
1 LED (Yagi) = 1/3 (5 watts) =1.7 watts
dB = 10 x Log (1.7/5 ) = – 4.6 dB
We now can easily calculate the Yagi Front to Back Ratio:
F/B Ratio dB = 9.0 dB – (-) 4.6 dB = 13.6 dB
(Remember, dB is a logarithm value, so we subtract the 2 numbers, not divide them)
C) Results Analysis
The result of 9.0 dB for Yagi Forward Gain is likely high considering an expected typical range of 6 to 8 dB (seen in commercial units). The estimate for the F/B Ratio of 13.6 dB seems low, again based on typical commercial units that can have an F/B of about 20 dB. However, the cited values are for “Far Field — Free Space” conditions; conditions not simulated in a 20 x 20 ft. room in my house. Also, the experiments made no effort to optimize Forward Gain or the F/B Ratio by element lengths and spacing.
The list of experimental error sources in our studies are many; a partial list includes detector circuit layout that combined RF, digital and DC signals on one board, the accuracy and precision limits of discrete LEDs, antenna height above ground issues and wall-plus-apparatus surfaces that both absorbed and reflected RF signals.
Still, the “Lego Style” Yagi Antenna Assembly permits an easy way to demonstrate many basic antenna properties while showing performance results that are reasonable. Perhaps, the next ham adventurer to design Version #3 will expand experimental versatility and improve performance areas.
I hope this series of three articles has expanded antenna knowledge to newly minted hams and has re-kindled interest in antenna experimentation for more experienced hams (many more knowledgeable than me). Coming full circle to my thoughts as I began this article series, our antennas are the magic carpet that we ride over the airwaves whether to friends across town or to that rare DX station 10,000 miles away. Enjoy the Ride!
I owe a heartily thank you to Skip Youngberg (K1NKR) for reviewing my draft manuscript for Part #3 and contributing valued suggestions. Also, the complete series of three articles could not have happened without the multi-media assistance, encouragement and full support from a special YL, Teresa Mendoza.
73,
Dave N1RF

