We’ve decided to collect all of this great content in one place here on our website so that our members can enjoy it. You can view it via the following links:
Take a trip down our Club’s Memory Lane or catch up on some topics from one of our many Tech Night sessions. There is lots of material here to use for fun and learning.
Most (but not all) of this content is in members-only sections of the pages so be sure to log in to our website to view all of the media that we have collected.
Thanks to all of our members for making so many great memories! We are looking forward to much more to come…
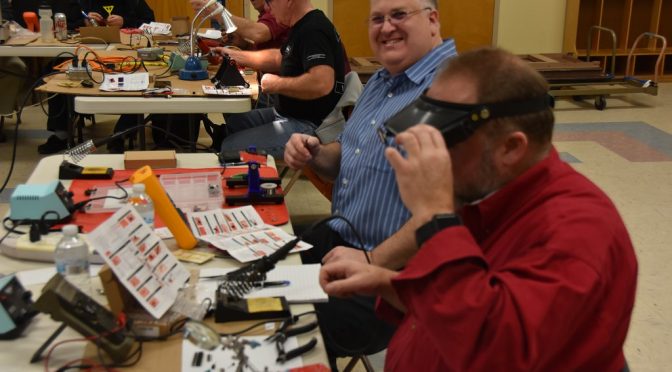
Our latest Tech Night became a Tech Day this past weekend. We got together on Saturday afternoon to build another kit – the DSO138 Oscilloscope. We had a great turnout with over 15 kit builders and helpers present.
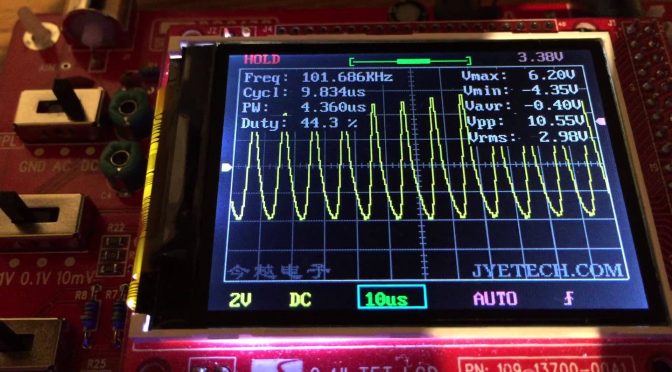
Finished DSO138 Scope Kit in case
Brian, AB1ZO choose this really cool kit for us to build. Here are some specifications for the finished DSO138 Oscilloscope kit:
Analog bandwidth: 0 – 200KHz
Sampling rate: 1Msps max
Sensitivity: 10mV/Div – 5V/Div
Sensitivity error: < 5%
Vertical resolution: 12-bit
Timebase: 10us/Div – 50s/Div
Record length: 1024 points
Built-in 1KHz/3.3V test signal
Waveform frozen (HOLD) function available
The kit came with all Surface Mount parts pre-installed.
The kit included a very nice case to finish off the project. This was a pretty big project to complete in a single afternoon but quite a few of our builders completed their kits and got them working!
The gallery below contains more pictures from our kit build. Everyone was very focused on the building process as we all wanted to get our kits to work in the time we had together.
Kit Builders 1
Kit Builders 1
Kit Builders 2
Kit Builders 2
Kit Builders 3
Kit Builders 3
Kit Builders 4
Kit Builders 4
Kit Builders 5
Kit Builders 5
Oscilloscope Kit Builders
Oscilloscope Kit Builders
Kit Builders 7
Kit Builders 7
Kit Builders Builders 8
Kit Builders Builders 8
Kit Builders Builders 9
Kit Builders Builders 9
Kit Builders Builders 10
Kit Builders Builders 10
Kit Builders Builders 11
Kit Builders Builders 11
Kit Builders Builders 12
Kit Builders Builders 12
Kit Builders Builders 14
Kit Builders Builders 14
Kit Builders Builders 15
Kit Builders Builders 15
Kit Builders Builders 16
Kit Builders Builders 16
Kit Builders Builders 17
Kit Builders Builders 17
Kit Builders Builders 18
Kit Builders Builders 18
Kit Builders Builders 19
Kit Builders Builders 19
Kit Builders Builders 20
Kit Builders Builders 20
How Does That Case Go Together?
How Does That Case Go Together?
Finished Scope Kit 1
Finished Scope Kit 1
Finished Scope Kit 2
Finished Scope Kit 2
Finished Scope Kit 3
Finished Scope Kit 3
Scope Kit Parts 1
Scope Kit Parts 1
Scope Kit Parts 2
Scope Kit Parts 2
Some folks did not quite get their kits completed and are planning to finish them at home. The following are some links and videos to help.
Here are some videos which show the assembly of the kit and its enclosure and the operation of the completed scope. The first video shows the kit in operation.
I know that Brian is planning to do more kit builds throughout the year so be sure to keep an eye on our Tech Night page to see what is coming!
I wanted to share some tips to follow for our 18 Feb Kit Build from 1-4pm. As I already built my own kit, I wanted to share some advice.
I know not all of you can attend, but for those of you who can, please read below. I’ll also post on the website along with some pics.
Make sure you bring a magnifying glass AND a multimeter. Also, might help to bring an LC meter too (though I didn’t have one at the time) The color bands on the resistors are particularly impossible to see, so I had to measure the resistance of every one. I even did it 2-3 times to make sure I was right.
To test your kit at the end of the night, you need to supply it with power. You can do this 2 different ways. The first is bringing a 9V battery along with 9V battery leads terminating at the end of a female port as shown below. The second is grabbing a power adapter rated for no higher than 12 V again terminating on a female port with pic shown below.
You might want to bring a small Phillips head screwdriver (for eye glasses) in order to perform probe calibration.
If you want, bring your laptop so you can download some signal generators (using your sound card) in order to play with the oscilloscope. In order to do this, I ended up using a BNC to an audio adapter which I purchased off of Amazon Prime. I’ll bring mine in case you don’t have one
If you have a standalone signal generator, please bring it, along with BNC wire connections for the o-scope.
DSO138 power supply port
9V battery adapter12V power supply (stolen from a Linksys router) with port (top-middle)
In order to do some testing, we are going to want to use either signal generators that club members graciously bring in, or you can use your laptop’s sound card. To that end, Mike (K1WVO) suggested a really nice link to do this.
We use cookies to ensure that we give you the best experience on our website. If you continue to use this site we will assume that you are happy with it.


 with port (top-middle)")