When the Nashua Area Radio Society’s Student/Teacher Contest Series was first set up, Fred and Anita (AB1OC/AB1QB) offered up their station to my son Keith (KC1IMK) and other students that do not have a station at home. Fred and Anita have an amazing station at their QTH and you can find more information on it here.
Then COVID arrived and sharing mikes, headphones, and keyboards at other people’s houses are no longer acceptable. We cannot risk getting each other sick. Another way is necessary. Remote Operation is here!
Fred (AB1OC) and Jamey (AC1DC) worked out the kinks for setting up Remote Operation first. Then Fred invited Keith and me to try it out. After a couple of hours online with Fred to set up, we were on our own. Contest Calendar showed the Helvetia Contest that night so we pointed the beams toward Switzerland and called CQ. Several stations pounced on Keith at once. He worked hard with the mouse, bouncing from the radio PTT button to logging in N1MM. Once the pile-up was cleared, he pulled off his headset and said “I really wish I had a footswitch like Field Day“.
Remote PTT Switch for SmartSDR
Driven to maintain my “Super-Dad” status, I went to work. I found a few references at the FlexRadio site:
https://community.flexradio.com/flexradio/topics/physical-ptt-for-remote-smartsdr
https://community.flexradio.com/flexradio/topics/remote-footswitch-how-to-lan-vpn-solution
Looked pretty straight forward to build a Remote PTT Switch. Configure a SmartSDR CAT interface to monitor hardware flow control pins in a standard serial port. The hard part today is to find a serial port. They have all been replaced by USB.
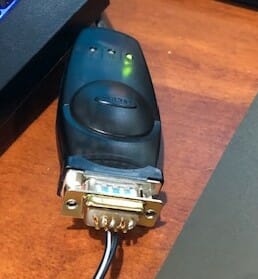
There are lots of USB to Serial adapter cables available today for around $20 that should work well. I would recommend one based on the FTDI chip. Jamie (AC1DC) successfully used a Sabrent USB 2.0 to serial from Amazon: https://www.amazon.com/gp/product/B07RFNHTL9/ref=ppx_yo_dt_b_asin_title_o02_s00?ie=UTF8&psc=1
I dug out a 15-year-old Belkin adapter from the back of my shack and installed it. A new Com3 port showed up in Windows 10 device manager.
SmartSDR CAT will detect if RTS is shorted to CTS in a Com port.
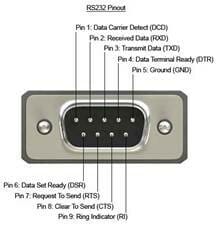
This is a very standardized interface and it was easy to find the pin definition.
Pin 7 is RTS
Pin 8 is CTS.
Easy to spot as they are the center two pins of the row of four.
I also had the mating 9 pin D connector in my bin of parts. One could probably solder to the pins of the adapter, but I would recommend a connector. I cut off the 1/4″ plug from a footswitch I bought from Amazon. The two leads were soldered to pins 7 & 8.
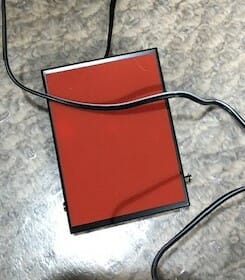
To test it, I downloaded ComTestSerial from Microridge https://www.microridge.com The test software confirmed the hardware worked. Each time I pressed and released the footswitch the CTS light in the top right corner changed between Red and Green.
Configuring FlexRadio SmartSDR
Now to configure the software. Open SmartSDR CAT and add a port. Give it a name. Set Port Protocol to PTT, set Port type to Serial, set Serial Port to Existing, and set CAT COM to your new Com port. Mine was Com3. Set VFO slice A. Select RTS. Hit save.

I found some open spectrum on 20m, crossed fingers, and pressed the switch.
Voila! It transmitted!
With prolonged use, I found my old adapter was not up to the job. The drivers were not meant for Windows 10. It missed about 1 out of 10 switch presses. I have since upgraded and the new Remote PTT Switch works great.
73, Mark/KC1IML
And here is a link to a more current USB to serial adapter for use in this application. You can learn more about the remote operating setup at AB1OC-AB1QB here.
Fred, AB1OC