Tag Archives: Station Building

A 4-Channel Audio Multiplexer That You Can Build

Audio multiplexers can be a useful accessory in any shack, and this one is easy to build for around $30 from readily available parts. All of the parts used in this project were sourced on Amazon.

The MUX described in this article will become part of a homebrew QRP SSB transceiver. The MOSFET MUX switches are borrowed from the webpages[1] of Rick, N3FJZ, but the selection logic is my own. N3FJZ has a large YouTube presence[2], too. Please visit both.

This device has a single input and four outputs. Since the MUX is bidirectional, one of two signals may flow towards the balanced modulator input upon transmit, and the product detector output may flow towards one of two outputs upon receive, i.e., two of the four channels are used for transmit and two of the four channels are used for receive.

The MUX has four modes of operation. Two are available upon receive, and two are available upon transmit. This design is expandable to more channels, but four is the practical limit for the CD4072 OR- gates used. For more channels, a microcontroller like an Arduino, or Raspberry Pi becomes more practical. An intermediate solution might be some sort of programmable logic array (PLA).

My specific application for this multiplexer is described in the sections that follow, but the same circuit may be used, bidirectionally, for small signals in most any audio application.

Upon Receive

1. Normal Discrete Audio Amplifier Path

This path employs a discrete audio amplifier to amplify the output of the SSB product detector which passes through one channel of the MUX. The output is available to a loudspeaker or headphones.

2. Leveled Audio Path

This path employs a dedicated, discrete audio amplifier to amplify the output of the SSB product detector that passes through one channel of the MUX. It supplies audio power to the W2AEW audio leveler circuit[3]. Alan Wolke has an enormous YouTube presence and following, too. His circuit is used to mitigate QSB fades from audio. The leveled output is of the order of 50 mV and must be amplified further. The leveled output is further amplified by the discrete audio amplifier of 1, above, before be being made available to a loudspeaker or headphones.

Upon Transmit

3. Microphone Preamplifier Path

This MUX path routes the output of a discrete microphone preamplifier through the MUX and to the input of the SSB balanced modulator.

4. Microphone Compressor Module Path

This path routes the microphone output to the input of an Analog Devices SSM2167 Low Voltage Microphone Preamplifier with Variable Compression and Noise Gating[4]. The output of the SSM2167 compressor module is routed to the input of the SSB balanced modulator. These modules are readily available on eBay[5] or Amazon[6]. There now appear to be two versions of the module; one with electret microphone bias and one without. The one being used for my application is the one without. Bias for my electret microphone is provided on my PCB. Please check the values of the compression ratio and noise gate resistors prior to using the module. They have been known to be reversed on some earlier versions of the module not having the electret microphone bias feature. My modules, purchased on Amazon, were alright.

How It Works

Referring to the top of the schematic in Figure 1, there are two lines labeled “From Audio Leveler IN/OUT Toggle Switch” and “From Compressor IN/OUT Toggle Switch.”  The former toggle switch, located on the radio front panel, asserts its commands upon receive, while the latter toggle switch, also located on the front panel, asserts its commands upon transmit.

Upon receive, the control panel Audio Leveler Toggle Switch when in its OFF state will call up 1, as described above. When the same switch is in its ON state (grounded), it will call up 2, as described above.

Upon transmit, the control panel Compressor Toggle Switch when in its OFF state will call up 3, as described above. When the same switch is in its ON state (grounded), it will call up 4, as described above.

There is a 2-relay module in the schematic. The relay to the left (not delineated) functions upon transmit while the relay to the right (not delineated) functions upon receive. Each relay has normally open (NO) contacts and normally closed (NC) contacts. Thus, there are 4 contact positions in total.

From the schematic, it may be seen that the +12V_TX voltage, a voltage only asserted upon transmit, will be placed on the pole of the left relay. Whether this voltage is applied to the NC contacts for the MIC or the NO contacts for the COMPRESSOR will depend upon the state of the corresponding front panel toggle switch.

From the schematic, it may be seen that the +12V_RX voltage, a voltage only asserted upon receive, will be placed on the pole of the right relay. Whether this voltage is applied to the NC contacts of the DISCRETE AMP or the NO contacts for the LEVELER will depend upon the state of the corresponding front panel toggle switch.

The inputs to the CD4072 4-input OR gates in the schematic are hard wired as shown according to the Truth Table. Any time there is a wire connected to a gate input, it signifies a logic HI input. If there appears to be a gate input skipped, that means that logic LO is signified.  Since only one of the vertical “wires” can have voltage on it at a time, each of the vertical wires, with its attendant gate connections, constitutes a logic state. This is what is called a “finite state machine” which is a big word for one, or more, hardwired programs. An OR gate functions such that there will be a logic HI output whenever there is at least one logic HI input. Else, the output is logic LO.

The MUX is implemented with 2N7000 MOSFETs used as SPST switches. Each of MOSFETS is driven from the output of an OR gate. The MOSFET will be ON whenever the output of an OR gate is in a logic HI state and OFF whenever the output of an OR gate is in a logic LO state. Each of the channels employs two MOSFETS; one in series and one in shunt connection. When a channel is unused, the series MOSFET will be OFF while the shunt MOSFET will be shorted (ON) to ground. That helps to ensure that the channel is really off. In reality that won’t happen because the MOSFETS have a finite (very high) OFF resistance and a finite (very low ON resistance). What is hoped is that the signal isolation will be good enough for most applications. As a matter of note, there are MOSFETs with lower ON resistances, but those tend to be MOSFETs with larger gate areas. Those devices tend to switch more slowly because of higher gate capacitance.

Four connections to the MUX are shown at J3, J4, J5 and J6 at the top of the schematic. J3 and J4 serve as inputs upon transmit only, while J4 and J5 serve as outputs upon receive only. Connector RF1 serves as the connection to the mixer that, upon transmit, functions as the balanced modulator while, upon receive, the same mixer functions as the product detector.

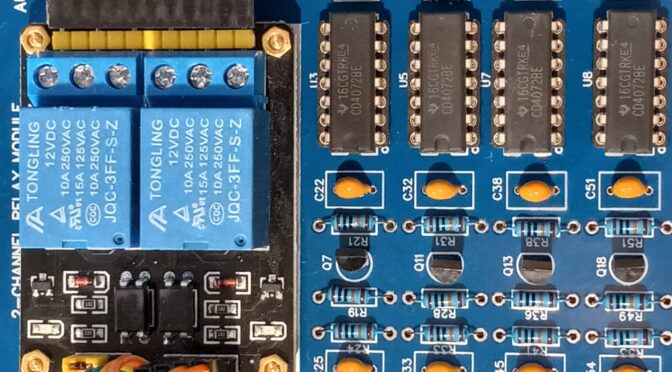
Component numbering on the printed circuit board, Figure 2, differs from the numbering on the schematic because Figure 1 was prepared prior to the board layout. The circuit wiring is the same, though.

Audio Multiplexer

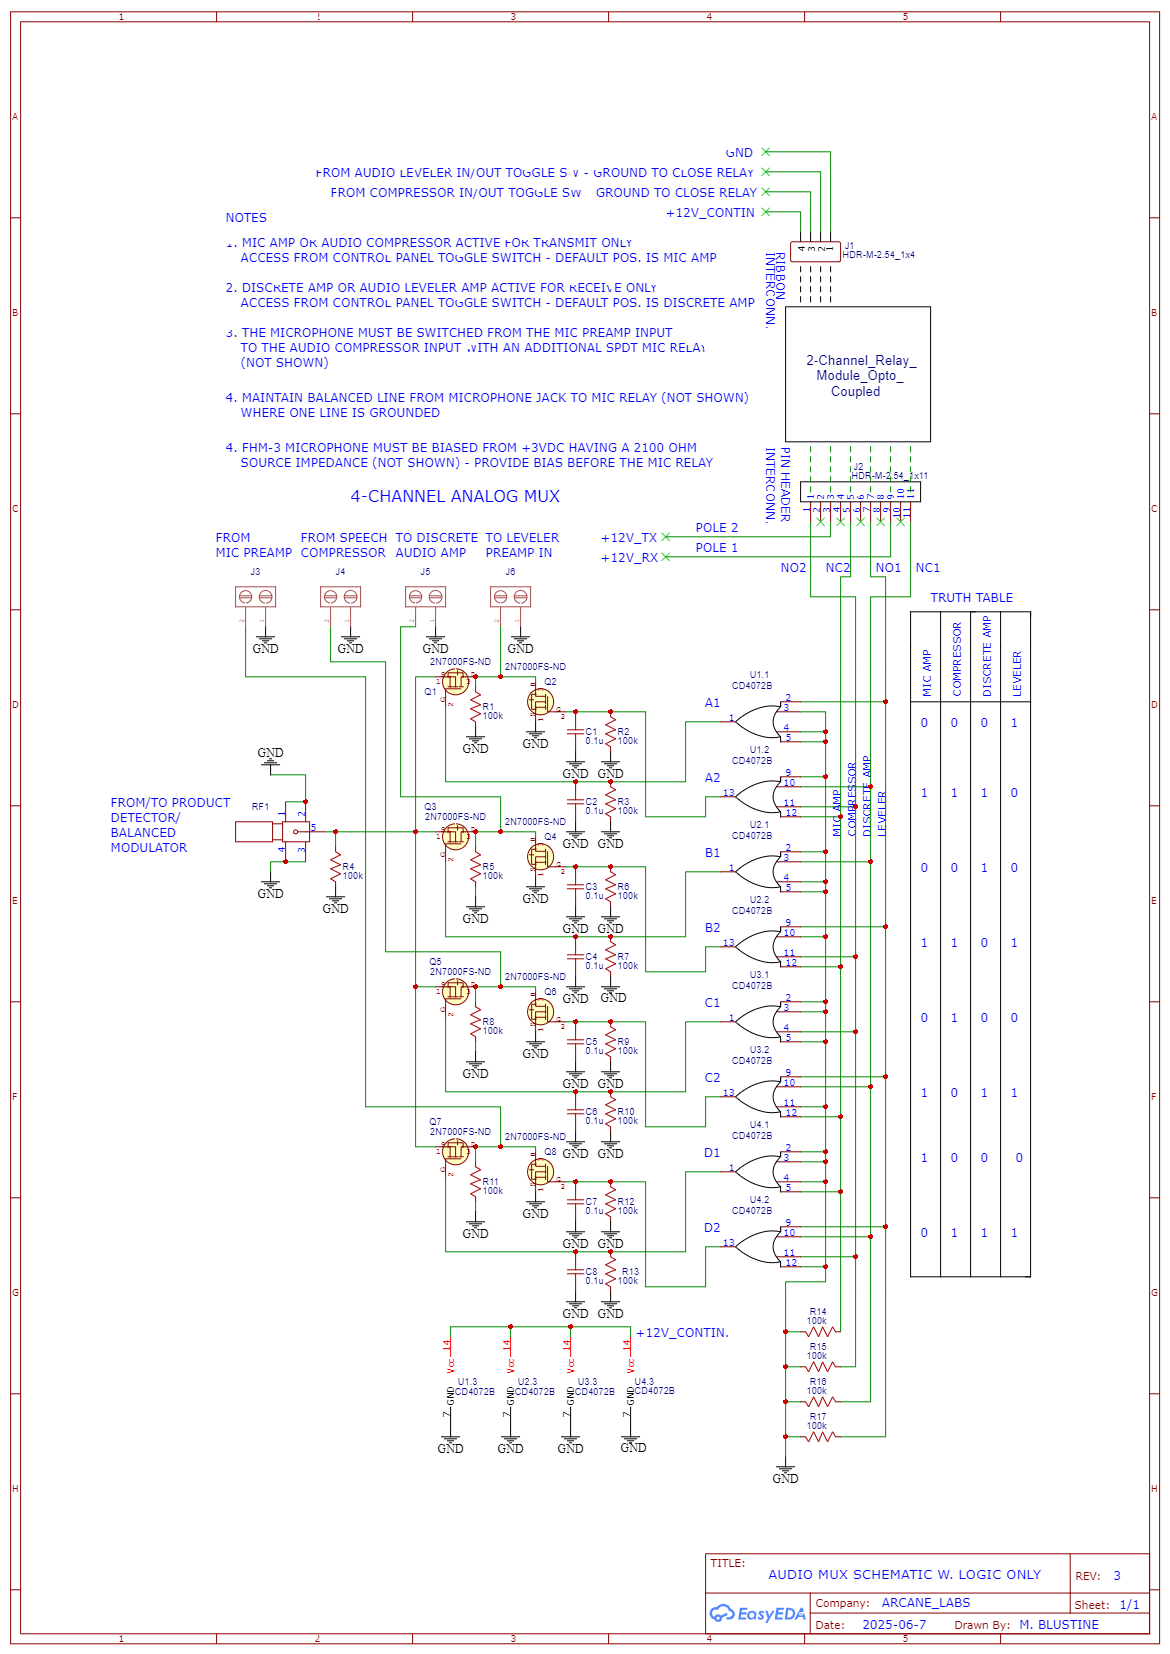
Figure 1. 4-Channel Audio Multiplexer. The MUX is driven by an array of 8 x 4-input OR gates that function to decode each of 4 logic states. For operation of this primitive “state machine” please refer to the text. Please click on the figure to open it in a new window.

Audio Multiplexer
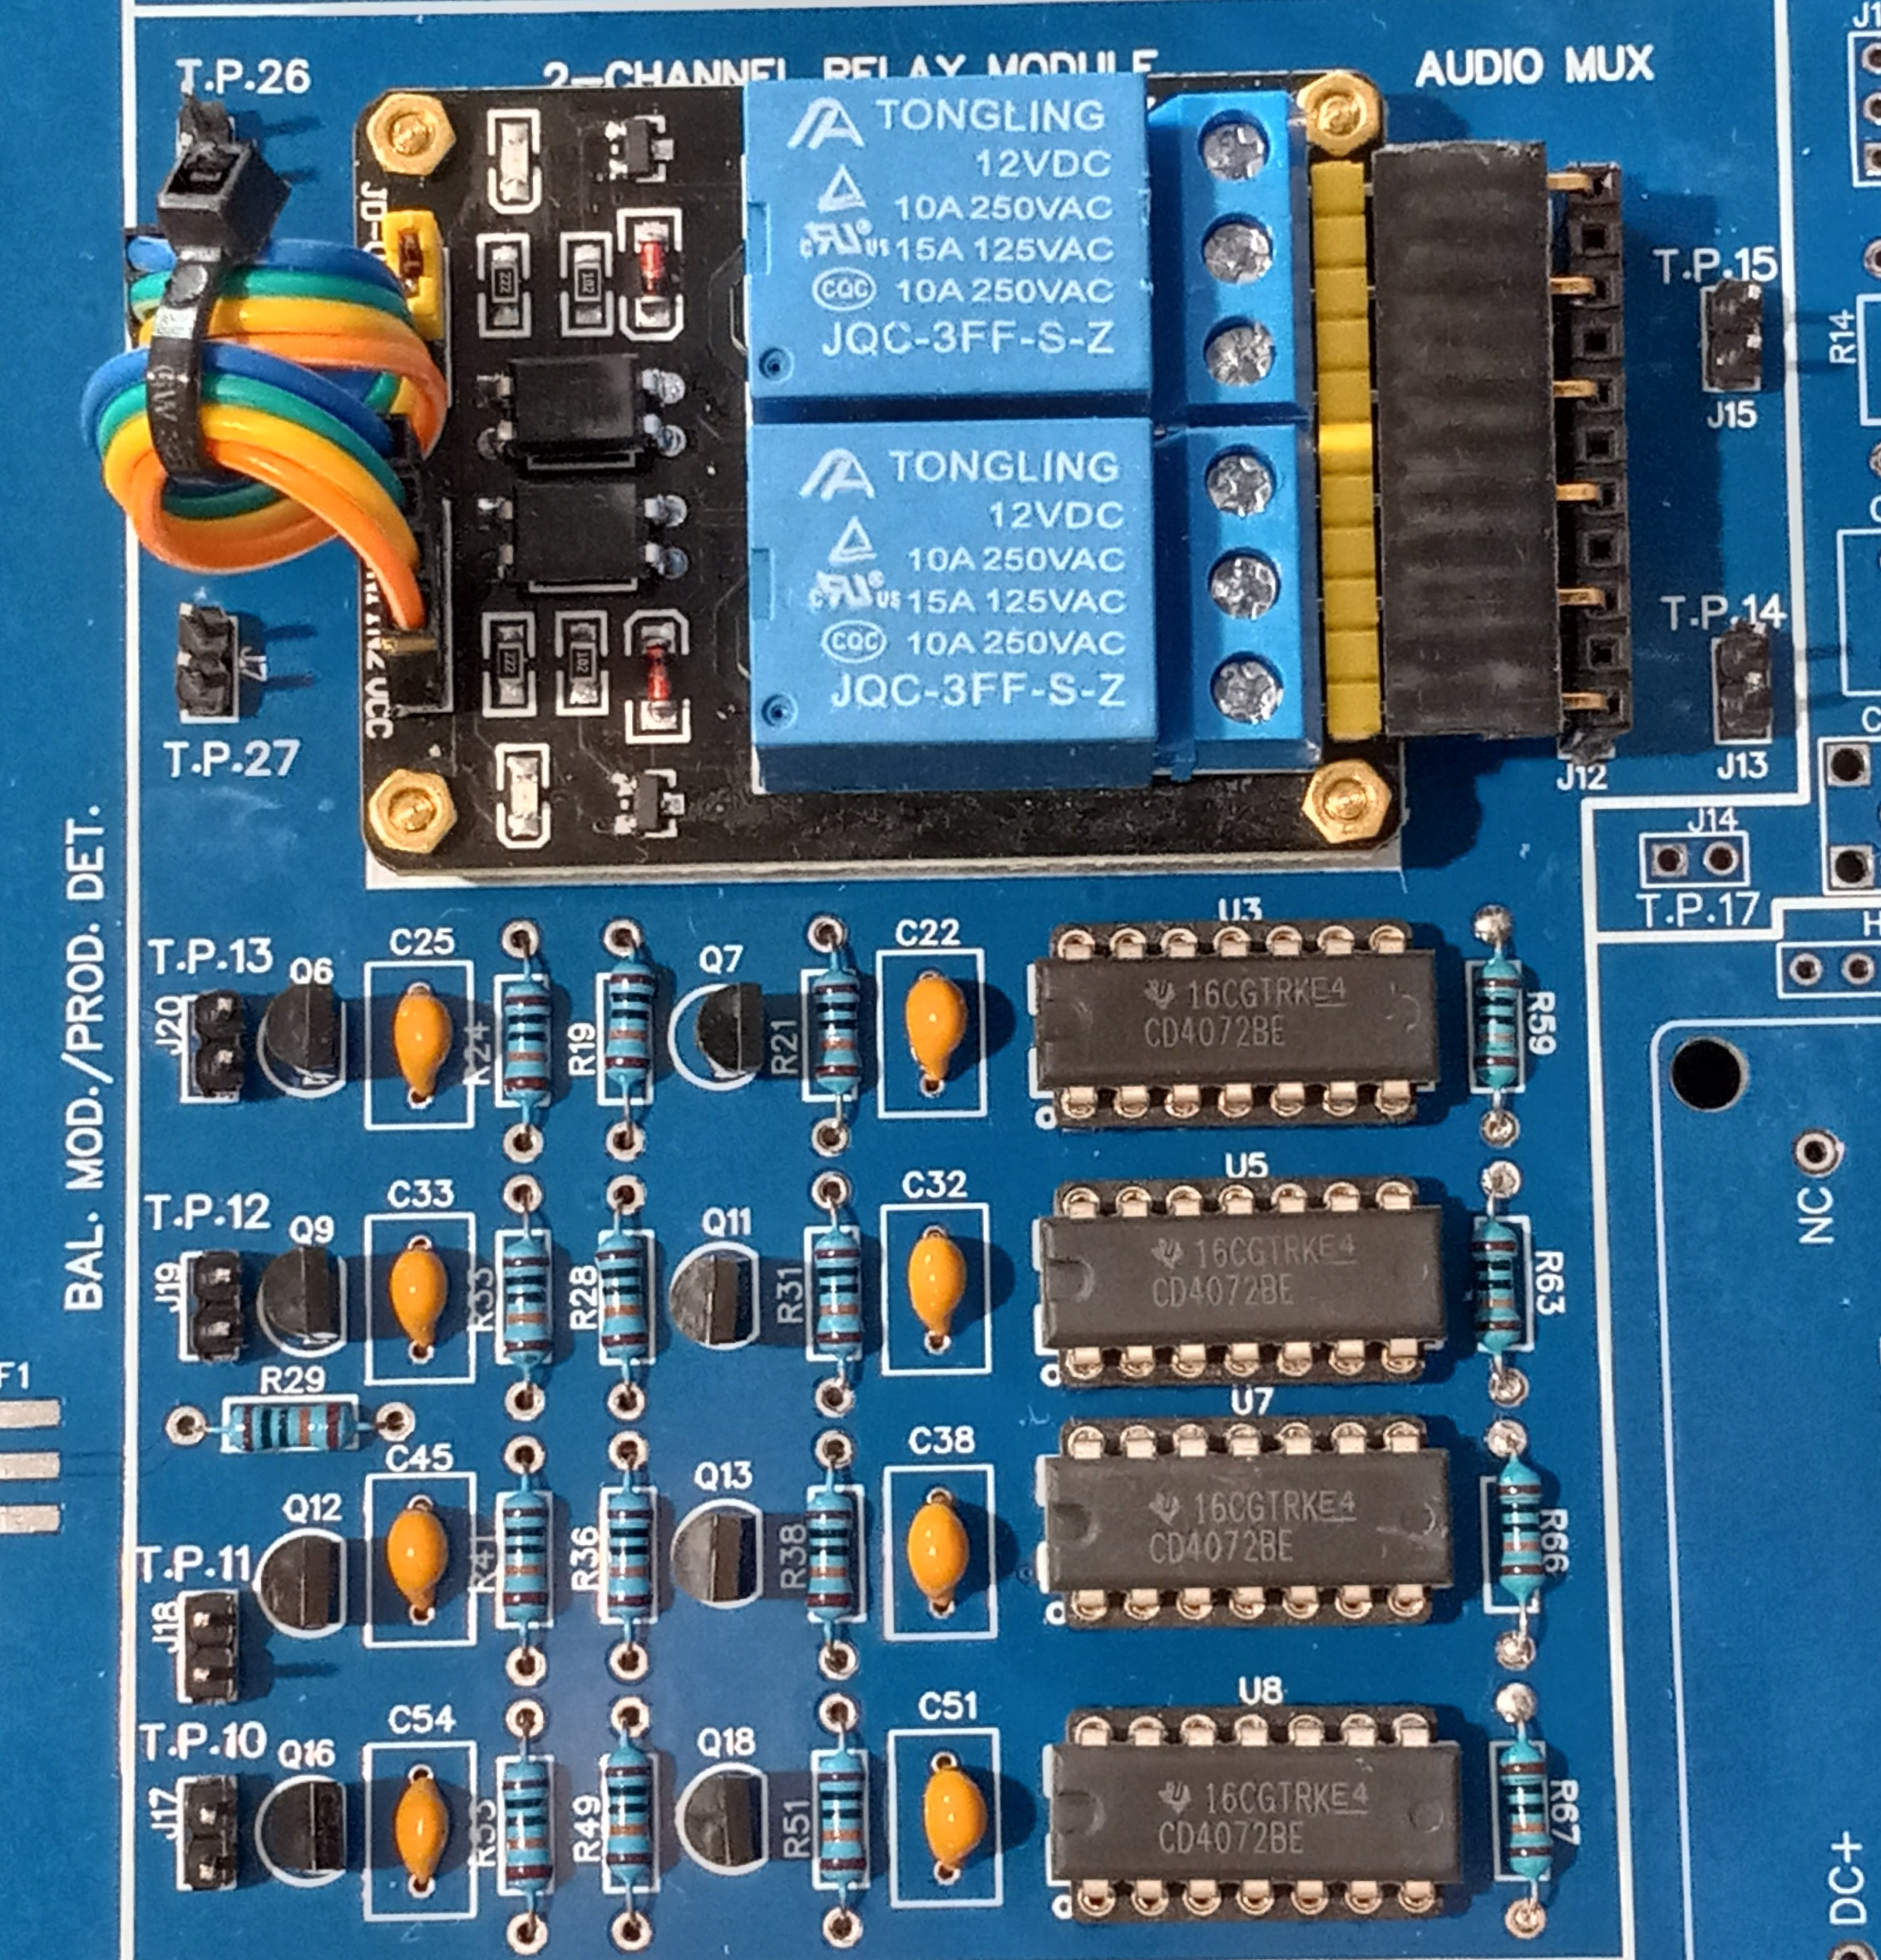
Figure 2. 4-Channel Audio Multiplexer PCB Under Assembly. This MUX is but a small portion of a much larger printed circuit board that contains all of the audio functions described in this article, namely receiver audio amplification, audio leveling, microphone audio amplification, and microphone audio compression. The small pads to the left of the photo are for an SMA connector that connects the MUX to a mixer that serves as a product detector upon receive and a balanced modulator upon transmit. The 2 x 4-input CD4072 CMOS OR gates (8 OR gates in all) to the right are configured to decode four logic states; two for receive and two for transmit. All transistors are 2N7000, all resistors are 100k ohm, and all capacitors are 0.1 uF. A two-channel relay is pictured. The upper relay is active upon receive, while the lower relay is active upon transmit. Please click on the photo to open it in a new window.

Board Design

The printed circuit board was designed using EasyEDA[7], an easy-to-learn online design tool. The boards were fabricated from a Gerber file sent to JLCPCB[8]. Turnaround time was less than one week including UPS shipping.

References

[1] http://www.remmepark.com/circuit6040/

[2]https://www.youtube.com/@Circuit6040/videos

[3]https://www.youtube.com/watch?v=1h0FZJYXQ_w&t=67s

[4]https://www.analog.com/en/products/ssm2167.html

[5]https://www.ebay.com/sch/i.html?_nkw=SSM2167&_sacat=0&_from=R40&_trksid=p4432023.m570.l1313

[6] https://www.amazon.com/s?k=ssm2167&ref=nav_bb_sb

[7]https://easyeda.com/

[8]https://jlcpcb.com/?from=VGPCBA&utm_source=google&utm_source=google&utm_medium=cpc&utm_medium=cpc&utm_campaign=20338495875&utm_campaign=20338495875&utm_content&utm_term=_&adgroupid&utm_network=x_&gad_source=1&gad_campaignid=21402499807&gclid=CjwKCAjw6ZTCBhBOEiwAqfwJdy-CiT4frGoHn5X52XdV657YjMH_3iZsSdxPhpuU1vFllYEuoX1a5RoC

Low-Band Receive Antenna Upgrades at AB1OC-AB1QB

Low Band Receive System - NCC-2

We have two low-band receive systems at our station:

These antenna systems use short active vertical antennas in various combinations to create directional receive antennas for the low bands (80m and 160m).

We recently upgraded our low-band receive antennas to use the latest electronics. The upgrades improved the performance of both antennas and enabled us to contact China on 80m. You can read more about the project here.

We did a guest spot on DXendineering’s weekly video broadcast about the project. You can view the video here.

Fred, AB1OC

Using My “Shack-In-A-Box” on a POTA Activation

Recently, I was asked not only how I made out during the Nashua Area Radio Society’s Sep 3, 2023 Club POTA activation from Rollins State Park (K-2676) and Kearsarge Mountain State Forest (K-4918) (it’s a two-fer), but what the gear was that I used.  So I decided to “pen” an article with some of the details.

The Box

Jay Francis, KA1PQK and I decided to put my go-box to the test in the field during this activation.  It is an unassuming, little old “shack in a box”… although it is a large box… a large dayglow yellow box. So, maybe it isn’t all that little or unassuming after all.  But I digress.

Apache 4800 for POTA
My unassuming go-box (the name plate in the center came from HamCrazy.com)

The go-box itself is built around Harbor Freight’s largest protective waterproof ABS case, the Apache 4800. Despite its size, the case lends itself to portability.  I literally only need to grab it and my trusty modified Lenovo N23 Chromebook (more on that later) and head out the door. I’ve used this same model Apache case to ship photographic gear all over the country.  It works exceptionally well at protecting my gear at roughly 1/2 to 1/3 the cost of a similar Pelican case. I like that, after all, I am a ham.

The go-box contains everything else I will need for an activation in any mode…  SSB, CW, or digital. Altogether, the go-box weighs in at around 8 pounds… light enough to easily deploy to most places, but heavy enough that I don’t want to hike with it for a SOTA activation.

The Station

The Radios

The station itself is designed around a Xiegu G90 SDR Transceiver. The G90 is a 20w, all mode, 10-160m SDR radio with some incredible features for such a reasonably priced rig. It has a built-in antenna tuner that will match nearly anything you can throw at it, a (small but useful) waterfall display, DSP noise reduction, etc.  The G90 is powered by a Talentcell rechargeable 12V 6000mAh Lithium-ion battery pack. While intended to charge cell phones via it’s 5v USB ports, the Talentcell has a very convenient 12v output port as well, and provides me with up to 2.5 hours of operating at reasonable output power for the radio.

For SSB, I use the stock Xiegu mic that came with the G90.  Surprisingly, for a $450 rig, I have received several positive comments on audio quality! For CW, I use a CW Morse paddle.  It is small, but hefty enough that it won’t move around the table when I am using it. As the G90 requires additional hardware for digital interfacing, I use a Xiegu CE19 digital interface kit connected to a Raspberry Pi 4b to allow me to operate FT8, RTTY, and other digital modes.

Finally, I have the Xiegu OEM CI-V USB cable that connects the radio to the Pi allowing for rig control and automatic frequency capture in the various software apps that I use.  Xiegu radios use the ICOM CI-V protocols for rig control, which makes them (generally) easy to set up and use.

The go-box also contains a QYT dual band mobile FM radio, powered by an external battery.  However, we did not use this radio on the activation.

The Antennas

All the RF is forced out of the radio into an MFJ-1899T portable vertical (which also lives in the Apache case when stored). The antenna  attaches at the back of the rig to a right-angle connector with a PL259-to-BNC adapter on it.  I also have a premeasured and marked counterpoise connected to the G90’s ground point that I deploy to improve the signal.

Jay brought his portable vertical setup as well.  It’s an MFJ 2286 portable 7-55MHz antenna on a Husky telescoping tripod.  We switched antennas from the 1899T to Jay’s 2286 roughly halfway through the activation.  Although I don’t have any empirical data, and my memory is like that of a 130-year-old, I recall that Jay’s vertical worked quite a bit better.  No surprise, given that the 1899T is a true compromise antenna.  But it does make Q’s.

WE1H go-box bottom
View of the bottom of the go-box containing the radios and stored antenna.

The Computer

The Pi is powered separately from the radio’s power source by an Iniu 10,000 mAh 5v battery and can run for 6 or so hours on a single charge.  As the Pi’s integrated audio hardware is insufficient for use with digital modes, I use an inexpensive Sabrent USB audio dongle which works nicely. For time synchronization, I either manually update the time on the Pi (as was the case on this POTA activation) or use a U-Blox USB GPS dongle connected to the Pi for a GPS time source.  I did bring a new solar charger setup with me on this activation, but never deployed it.

The Software

The software on the Pi is a critical part of the entire solution, without which, the whole “shack in a box” concept goes out the window (ask me how I know this).  At the base is the Raspberry Pi O/S, which I built from KM4ACK’s awesome Build-a-Pi solution. Although BAP is being replaced by 73 Linux, it is still an excellent quick deployment solution for a Raspberry Pi.  The Pi contains a host of software applications that you would find in any shack, as well as some that are specifically EMCOMM related, and some that facilitate portable operation.  I’ll go through what we used during the activation and leave the other details for a future article perhaps.

The Pi also has a hot-spot solution that auto starts when no known network is detected.  The hot-spot is the real key to the overall shack-in a box solution though… but more on that later. For rig control, FLRig is my go to – it allows FLDigi, WSJT, and my logging program, CQR Log, to have connectivity to the radio.  When operating SSB or CW, I simply fire up CQR Log and it starts FLRig, which connects to the radio, and I am off to the races.  If I am instead  operating digital using WSJT or FLDigi, I need only to tell CQR Log to start either program, and it seamlessly connects and shares QSO data (I say seamlessly now, not so much until I truly figured out how to integrate the software pieces… but that’s for another article too).

WE1H go-box top view
View of the top of the go-box case. All of the components are secured to the  top by industrial strength Velcro fasteners. Some improvements were made post-activation to control the cables and wires better, and clean things up.

The “Other” Computer

Truly attentive readers may have noticed something missing though…  a screen with which to view the Pi desktop.  That’s kind of important.  This is where the hot-spot feature of the Pi is really handy.  It’s also where my Lenovo Chromebook comes into play.  Although in reality, the Lenovo is no longer a Chromebook per se, but more of a “Linuxbook”.  I removed Chrome from it and installed Debian Linux instead. There are videos on YouTube as to how to do this.  It’s a great way to “rehab” an outdated Chromebook that cost $7 on eBay, and Linux is a great choice for portable ops as it is so much more flexible than Windows (in my opinion).  I use the Linuxbook to VNC into the Pi and view the desktop.  It is a slick solution that I admittedly copied from others.  Any device with a VNC software app can be used, provided it can connect to the Pi’s hot-spot network (you do however need to know the password to the hot spot, which I now have written down).  This includes Windows systems, iOS devices, Linux devices, Android devices, etc. In a real EMCOMM situation, that level of flexibility is nice.

The decision to include a Pi in the go-box was a simple one for me…  having a preconfigured hardware / software solution with all of my apps in a single self-supporting enclosure requiring only a VNC capable device to operate it seemed like a pretty cool idea.  So far, barring some experimentation and poor decision making by yours truly, it has proven mostly reliable.

Results

So, how did it do during the activation?  We made 23 QSO’s running anywhere from 5 to 20 watts:  21 FT8, and 2 SSB.  We contacted hunters all over the country…  TX, OK, MS, NC, SC, IL, NH, GA, and even a DX station in England.  Several park-goers stopped and talked to us about what we were doing, and we got to explain Ham Radio and POTA to a number of them.  While it certainly proved a useable solution for the activation, I am constantly looking at ways to refine it and make it better and more “bullet proof”.

Deployed WE1H go-box POTA
The “fully deployed” box ready for operating.

Here are some links to the various components of the go-box in case you are interested in more details:

Apache 4800 case: https://www.harborfreight.com/4800-weatherproof-protective-case-x-large-yellow-56865.html

Xiegu G-90: https://www.hamradio.com/detail.cfm?pid=H0-016772

Raspberry Pi 4b: https://www.raspberrypi.com/products/raspberry-pi-4-desktop-kit/

Sabrent USB Audio: https://www.amazon.com/gp/product/B00IRVQ0F8/ref=ppx_yo_dt_b_search_asin_title?ie=UTF8&psc=1

KM4ACK Build-a-Pi: https://github.com/km4ack

WSJT: https://wsjt.sourceforge.io/wsjtx.html

FLDigi: http://www.w1hkj.com/

CQR Log: https://www.cqrlog.com/

U-Blox GPS: https://www.amazon.com/gp/product/B00NWEEWW8/ref=ppx_yo_dt_b_search_asin_title?ie=UTF8&psc=1

MFJ 1899T Antenna: https://mfjenterprises.com/products/mfj-1899t

MFJ 2286 Antenna: https://mfjenterprises.com/products/mfj-2286

Husky K40366 Tripod: https://www.homedepot.com/p/Husky-Universal-Telescoping-Tripod-K40366/319012088

Iniu Battery https://www.amazon.com/gp/product/B08MBQS368/ref=ppx_yo_dt_b_search_asin_title?ie=UTF8&th=1

Talentcell Battery: https://www.amazon.com/gp/product/B00ME3ZH7C/ref=ppx_yo_dt_b_search_asin_title?ie=UTF8&psc=1

Apache case ID tag: https://www.hamcrazy.com/index.php?main_page=index&cPath=44

If you decide to build your own go-box, have fun, get creative, and post some pics on the N1FD.org site!

Radio Amateurs Developing Skills Worldwide