Tag Archives: Digital

The Sound Card

The Sound Card and How it Works

For a ham radio operator trying to work the digital modes for the first time, half the battle is installing the software and learning how to make it work. The other half of the battle is installing the Sound Card,  making all the right adjustments, and trying to make that work successfully. However, if you have one of the newer ICOM, Yaesu, or Kenwood radios, that struggle is almost eliminated as they have their sound cards built-in.

But, if your transceiver doesn’t have one, you’ll need to come up with something that takes the audio from the computer and run it into the radio; and then from the radio and back into the computer.

Basic Sound Card with Dongle

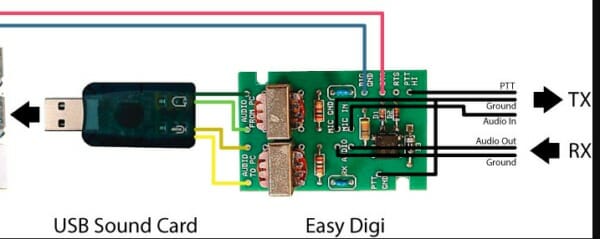
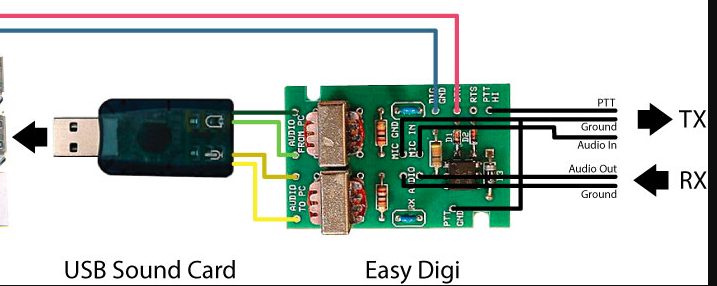
As shown above, the cheapest way to deal with this is to buy a USB audio dongle from eBay for about $ 3 and then a sound card kit for about 10 bucks. And finally, you’ll need to purchase a few 3.5 mm cables to connect from the dongle to the sound card. Then the fun begins, trying to figure what cable goes to where.

Inside the Sound Card

Essentially, a sound card is a device that takes the audio produced from the computer, matching the impedance between the computer and the radio and attenuating the signal considerably. Otherwise, the audio signal would be too strong for the radio to work properly, overloading the distorting it. Likewise, when sending a signal back from the radio to the computer, the audio has to be controlled and the impedance matched between the two pieces of hardware.

Typical Sound Card Schematic

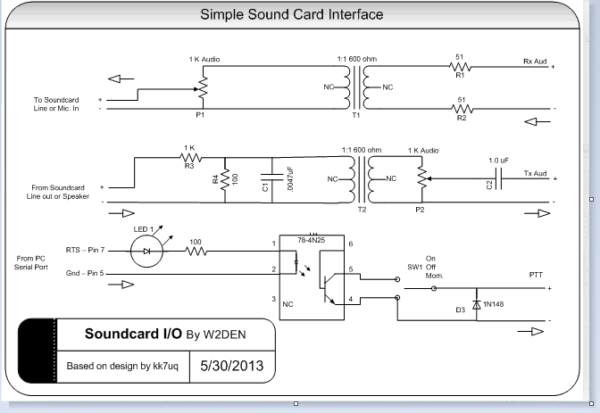
The schematic above shows the audio coming from the USB dongle into a resistor divider network, at R3 and R4, which steps down the signal by 100 to 1. Then the audio goes through T2 for impedance matching. At the input and output to T2, there are capacitors used for shaping the signal going from the computer to the radio.

Going from the radio back to the computer, the schematic is similar; it uses a transformer, T1, used for impedance matching.

On better sound cards, potentiometers are used for further adjustment for the inputs and outputs.

Some sound cards provide for the capability of operating the PTT circuit by taking the control signal off the DB 9 connector on the computer and sending it to an optocoupler on the sound card. This is used to separate any difference of potential which might exist between the two pieces of hardware.
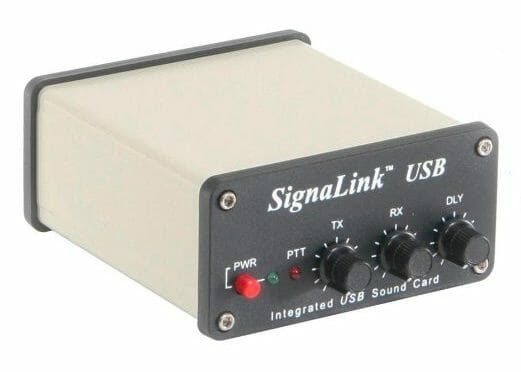
A Better Solution

Signalink USB

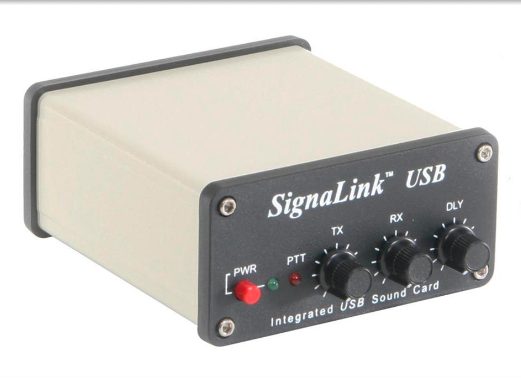
Of course, the easiest way to deal with this is to purchase something like the Signalink USB card from a supplier such as Ham Radio Outlet for about $ 125. The advantage to this card is that it plugs directly into the USB connector on your computer – eliminating the USB dongle –  and then connects to the radio with a special DIN connector at the other end. Also, this card has individual controls for TX, RX, and Delay.

Final Adjustments

Enough can’t be said about the need to make sure the right audio levels are set for the inputs and outputs at the computer and the radio. If the audio is too strong going into the radio, your transmission will distort, making QSOs harder to get. And at the other end, if the input signal is not at the proper level to the computer, the software will not be able to pick up the incoming sound.

My hope here is that with a little understanding of the sound card and what it does, this will make your next QSO on one of the digital modes as smooth as possible.  With some trial and error worked out, your next contact will be a lot easier. 73

Randall N1KRB


EME Station 2.0 Part 11 – EME Station Hardware In Shack

Now that our 2m EME Antenna Array is fully installed, we have turned our attention to the set up the EME Station Hardware in our Shack. Our plan is to do a mix of JT65 Digital and CW operation with our 2m EME…

Source: EME Station 2.0 Part 11 – Station Hardware In Shack

EME Station Block Diagram - Phase 1
AB1OC-AB1QB 2m EME Station Block Diagram – Phase 1

We’ve created a Phase I Architecture that uses an SDR Dongle and manual selection of Receive Polarity via a switch. We also added a receive splitter and a Transmit/Receive relay in front of an Icom IC-9700 Transceiver which is dedicated to our EME setup to enable both the MAP65 and WSJT10 Software Decoders to operate simultaneously.

This approach has some significant advantages when conditions are poor as one of either MAP65 or WSJT10 will often decode a marginal signal when the other will not.

Special Transmit/Receive hardware was created and added to the sequencing system in our EME station to permit the simultaneous operation of two separate receivers and software decoders for JT65.

The article also covers the installation of a Reference Locking Board in the IC-9700 which allows the IC-9700 to be frequency locked to a clock derived from GPS Satellites.

You can read all about the setup of our EME Station Hardware via the link above.

Fred, AB1OC

Exploring Winlink

Emailing on HF

If your internet goes down or you lose cell phone connection, how do you get important emails to the outside world? Winlink provides this capability! A must for groups like ARES.

With Winlink, all you have to do is download the program to your computer; then connect the transceiver to the computer with all of the interfacing hardware, and then write your message within the Winlink program and hit ‘Send’.

Sounds easy enough?

When you hit Send, your computer will sound like a dial-up modem from the  1980s, as the computer and your radio connect to an HF station and the email is sent. Once the message is received, it is sent the rest of the way via the Internet to its final destination or stored on the Winlink server until retrieved by the receiving Winlink account.

Winlink - The Main Page
The Main Page

Some Good News

The good news is that the program you need – Winlink Express – is free and rather easy to install.

The other good news is if your computer and transceiver are already set up for other digital modes – such as FLDigi and WSJT-X – you’re ready to go.

Winlink Hardware Requirements

The type of sound card you need is already installed in some radios like the ICOM 7300. Otherwise, try the Signalink USB from HRO for about $ 125. It has input and output controls on the outside of the case, making adjustments easy.

For Xiegu users, Xiegu sells the CE19 card for about $ 35.

And if you want to use the CAT function to control PTT,  use a standard 3.5 mm to USB serial transfer dongle.

However, if you are capable of using the VOX function on your radio, no CAT cable is needed

Setting Up Winlink

Winlink - EMAIL Page
EMAIL Page

After you’ve installed the program, it will open up to the main page. Go to the top-left of the page and click the ‘Message’ button which will open up the Email page. From there, write a Test message – with a proper email address, subject, and message – then click  ‘Post To Outbox’.

Go back to the top-left of the main page to the ‘Settings’ button and fill out all the required information – your call sign, your name, grid location, etc.

Then go back to the top-right of the main page and make sure the drop-down menu is on ‘Winmor Winlink’. And finally, click on the ‘Open Session’ button, just to the left. This will open up a whole new window which will require you to fill out more information.

Winmor Winlink Menu
Winmor Winlink Menu

The ‘Open Session’ Page

When you get to the ‘Open Session’ page, go to the upper left-hand corner to the next ‘Settings’ button. The first item to open up is the ‘Winmor TNC Setup’. Here you assign the audio input and output drivers to the sound card.

If you need to use the CAT function, go to the next settings’ item – ‘Radio Setup’ – where you will indicate what radio you’re using.

And finally, go to the top-center of the page and click on the ‘Station Selection’ button, to determine what HF station to use.  A list of all the stations available will appear, based on your grid location, with those highlighted in Green as the best choices.

Winlink - Station Selection Page
Station Selection Page

With all this said and done, go to the right-top side of the window and click on ‘Send’. A new window will appear – the TNC Card window – showing you all the handshaking going on as the software starts to search for the station and sending the message. When completed, the email sitting in the Outbox will be gone.

It does take a few minutes for all of this to happen, so you have enough time to get a cup of coffee while you’re waiting.

This has been a quick description of how to set up Winlink. There is a lot more information on YouTube and other Internet sources if you need it. I know I did.

From my experience, it took some trial and error before I got the audio inputs and outputs set up correctly. Also, I needed to find the proper setting for the VOX gain.

And I also found the best station from New Hampshire to use is the one in Maryland, which required 50 watts to reach it.

But, now that I’ve done all of this, I  feel I’m ready for the big one to hit, knowing that I can get an emergency email out to the outside world …. only if I can remember all the steps.

Randall, N1KRB

Radio Amateurs Developing Skills Worldwide