Introduction
Previously [1], an RF to IF Converter was described that precedes this module in a 10-Band QRP Single Sideband (SSB) transceiver.
The IF to Audio Baseband Converter modules described in this paper both serve to convert a 9 MHz Intermediate Frequency (IF) to baseband audio upon receive and from baseband audio to a 9 MHz IF upon transmit. Only one of these modules is required, and an explanation is provided for why two have been designed and built.
The discussion in this paper will be restricted to voice transmission and reception. Digital data transmission and reception on SSB will not be discussed.
Though used in the form of a trigonometric identity in one of the derivations; discussion of the Hilbert transform has been avoided.
Circuit Design
There are circuit commonalities and differences for both circuit boards designed for this application.
Module Commonalities
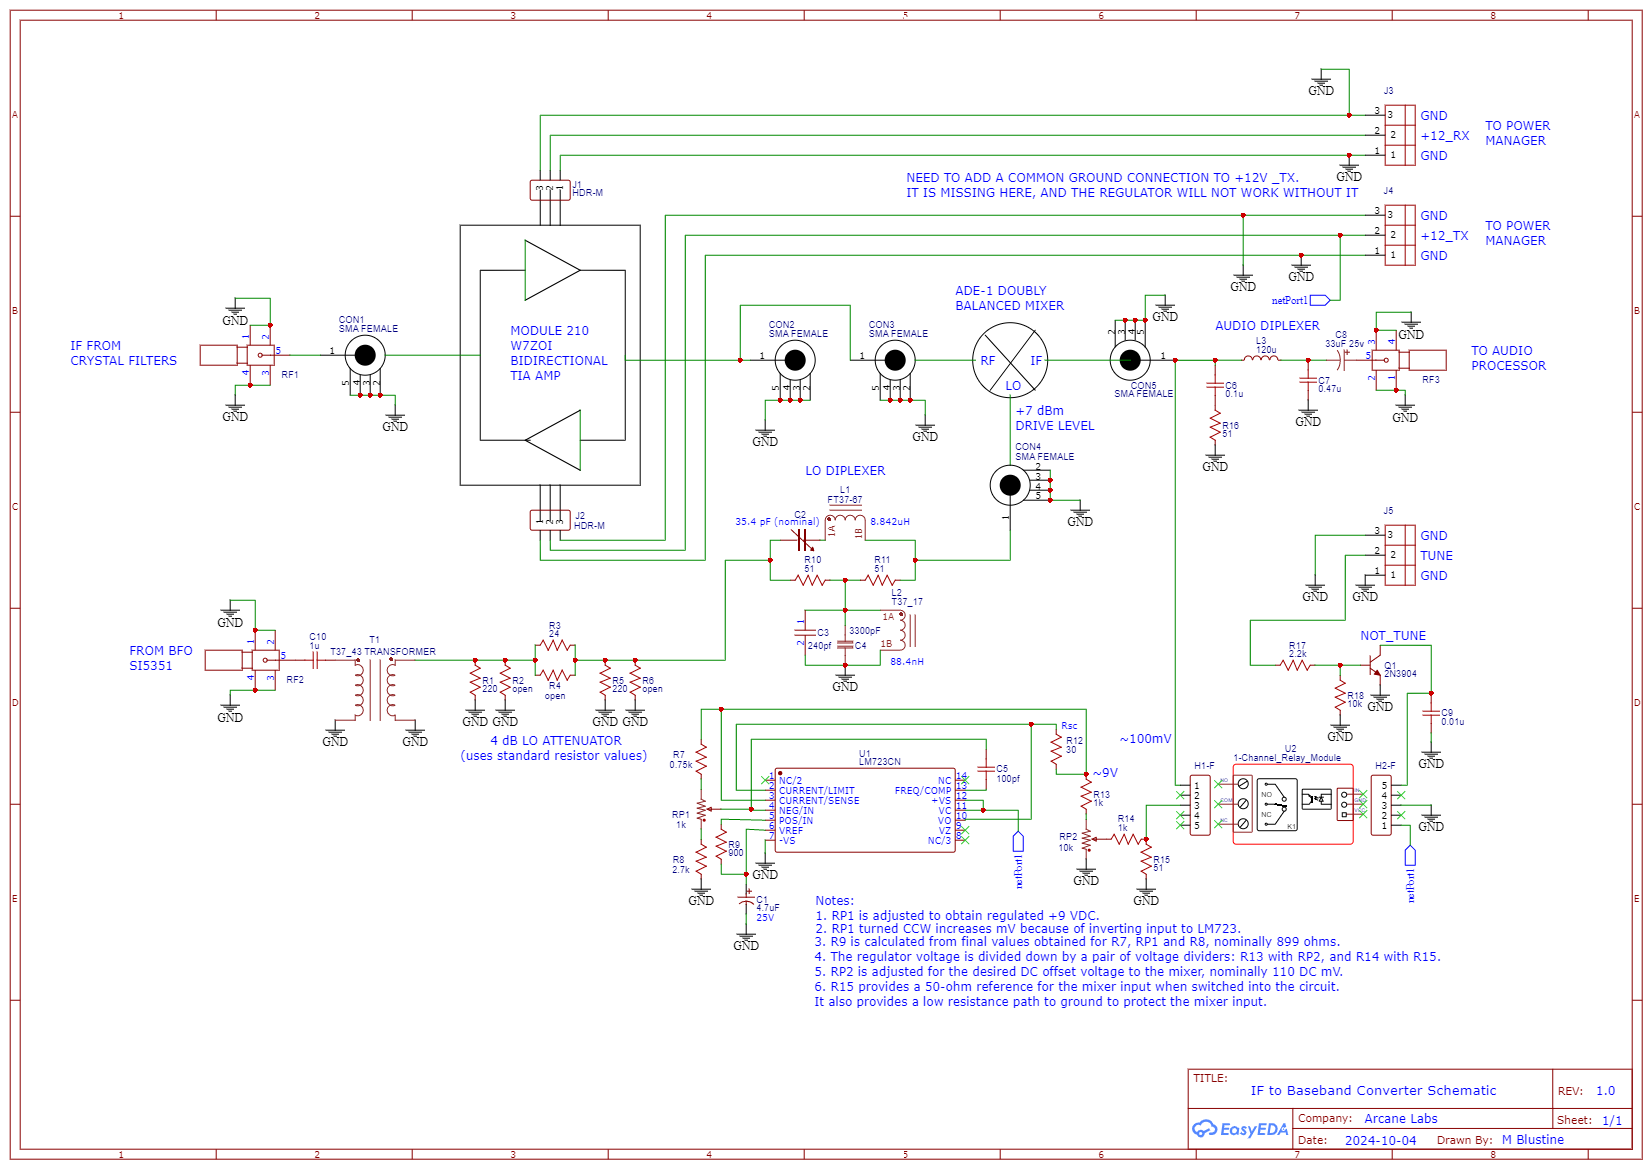
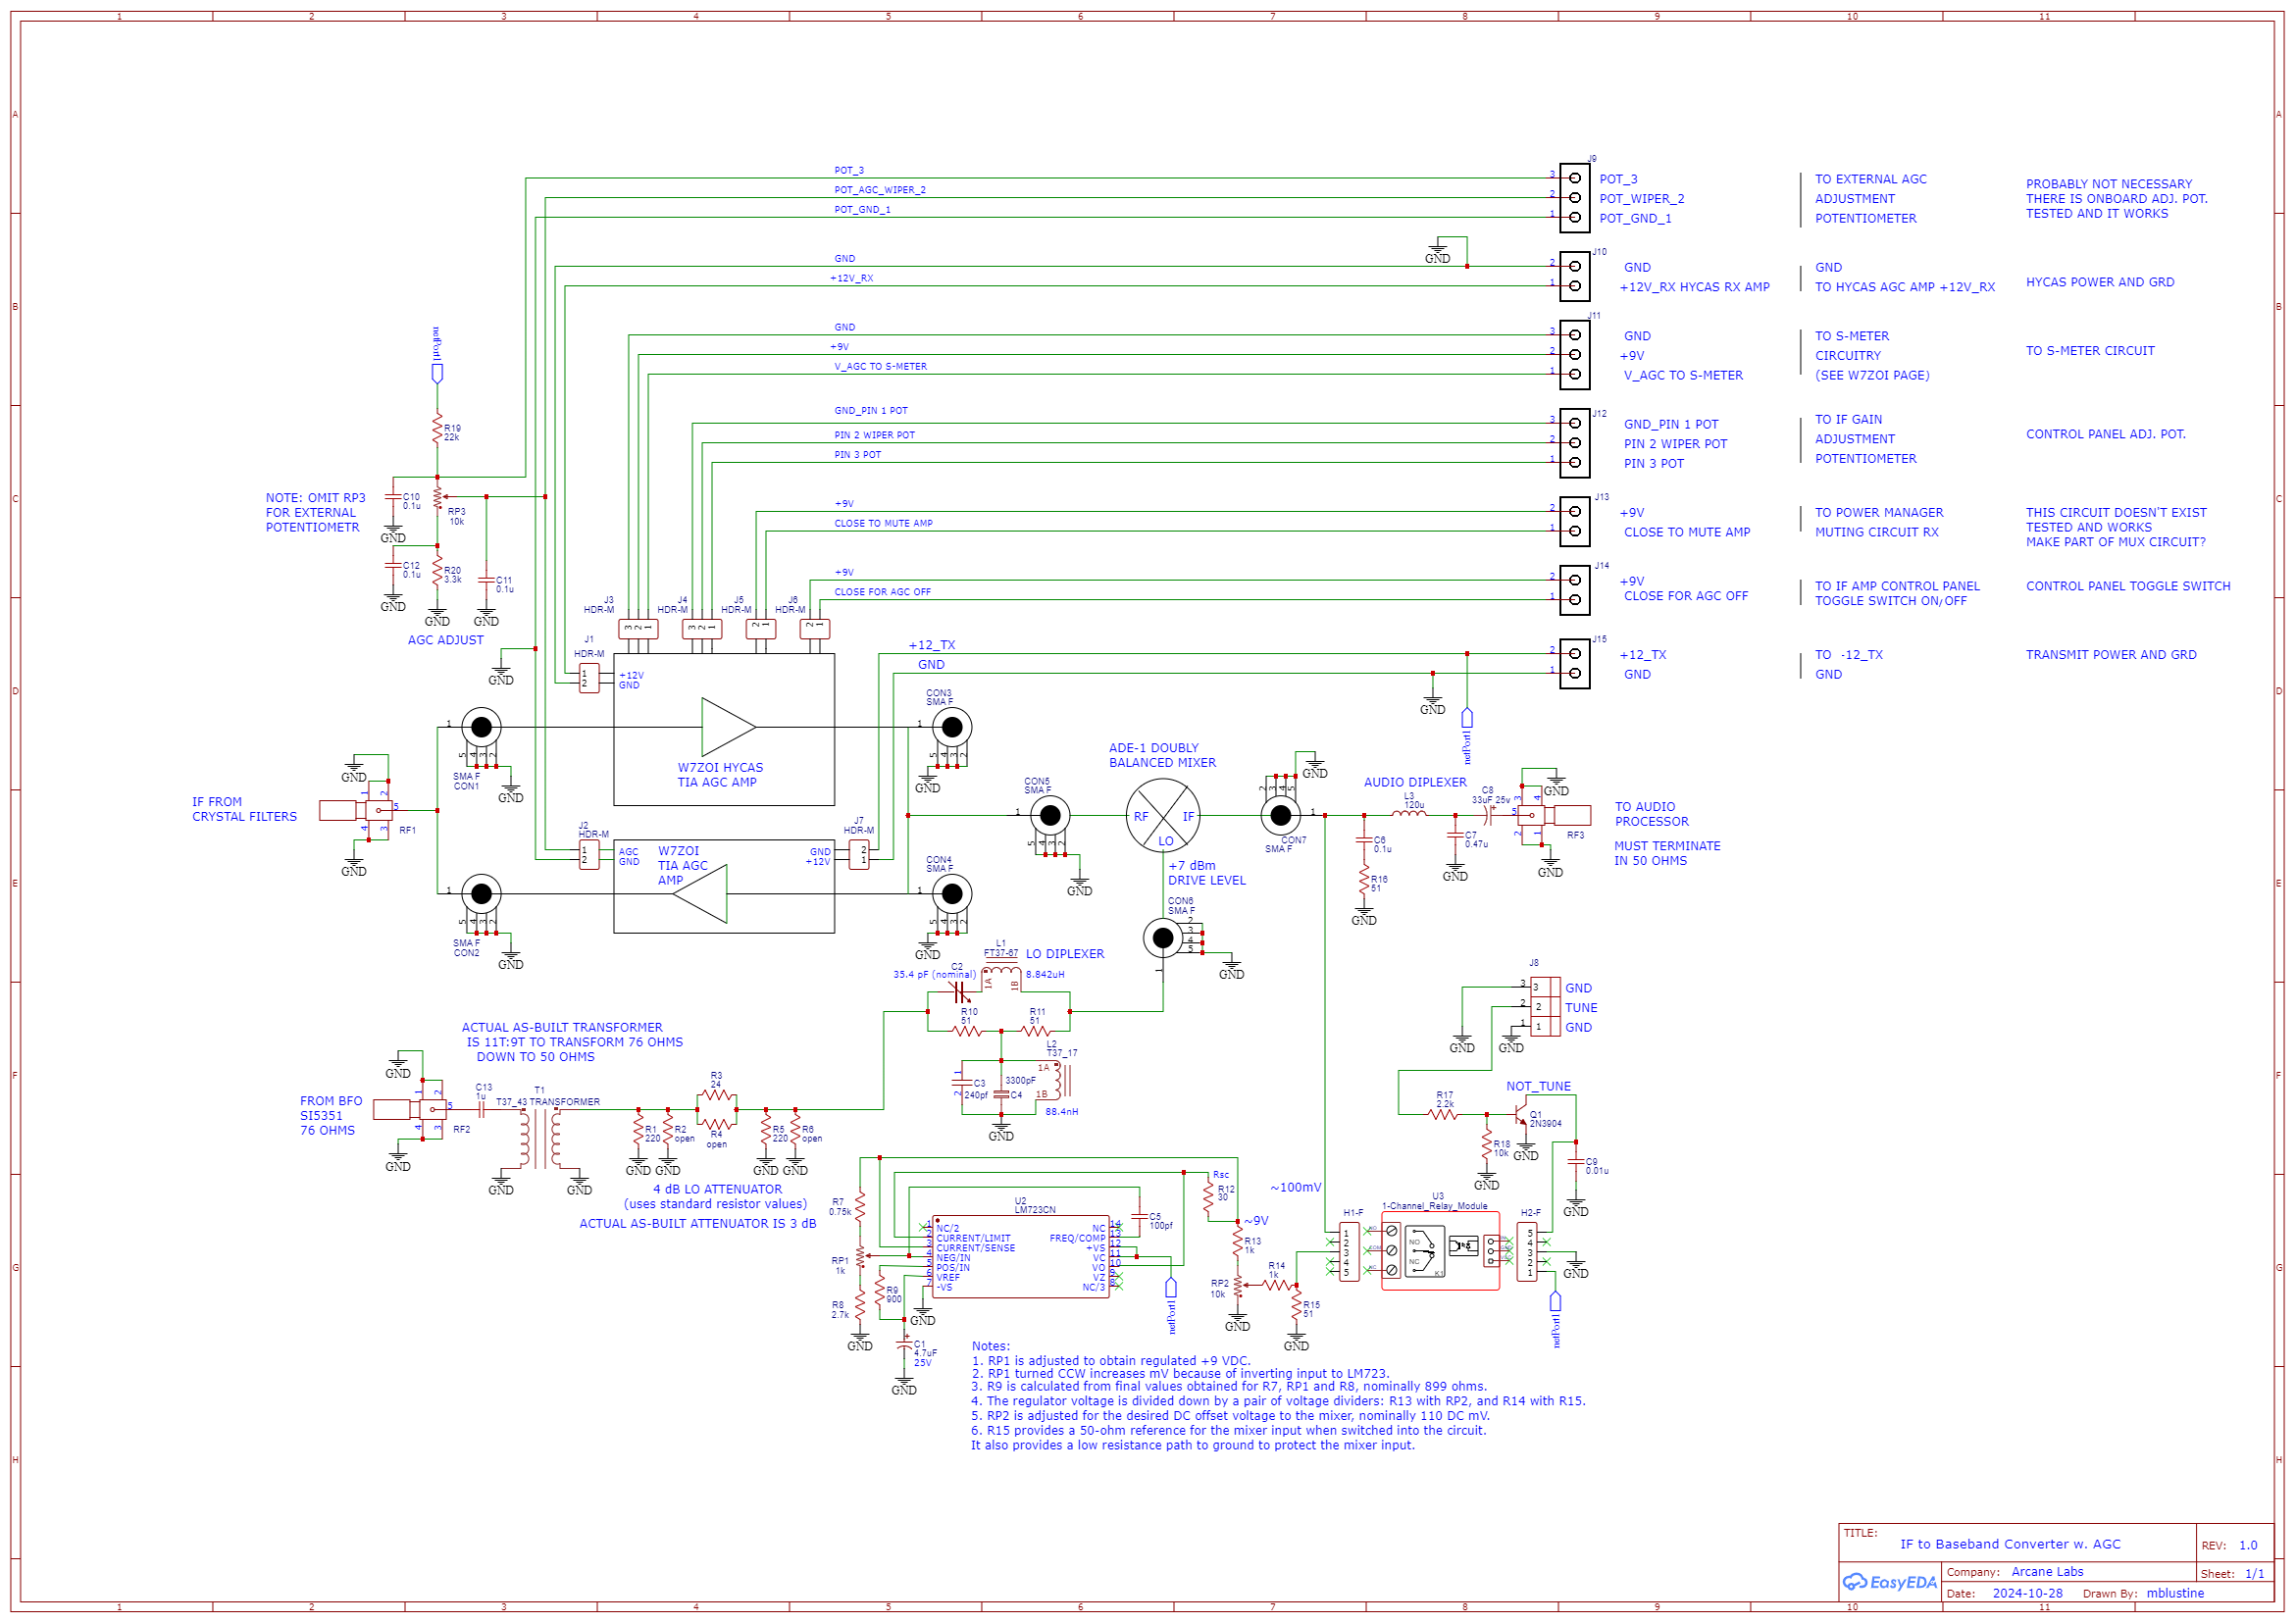
Please refer to the schematic diagrams in Figures 1 and 2 for this discussion. Both IF to Audio Baseband Converters employ Bridged-T Diplexers [2][3], pi-attenuators [4], and impedance matching transformers [5] on the BFO ports of their Mini-Circuits ADE-1 mixers [6]. Both employ audio diplexers [7] on their mixer IF ports. Both employ a low noise LM723 regulator [8] in a millivolt DC power supply to unbalance a Mini-Circuits ADE-1 mixer used as a balanced modulator for the purpose of reinjecting a carrier into the up-conversion path upon transmit. The carrier is used for antenna tuning. The command to unbalance the balanced modulator is asserted from the Control Panel by depressing the push-to-talk (PTT) button on the MIC or the PTT push-button on the Control Panel once the F1 button on the Control Panel has been pressed to display Tune on the 3.2” TFT display [9]. The Control Panel and TFT display will be described in another article.
One further commonality is the dual-function use of ADE-1 mixers in both module designs. Upon receive, they serve as product detectors for demodulation of the time-dependent audio message. Upon transmit, they serve as balanced modulators to mix the time dependent audio message with the IF carrier frequency for up-conversion. Descriptions of how product detectors and a balanced modulators work are provided in later sections.
Module Differences
Please refer to the schematic diagrams in Figures 1 and 2 for this discussion. The first IF to Audio Baseband Converter module incorporates a Wes Hayward, W7ZOI, fixed gain, bidirectional, termination insensitive amplifier (TIA) [10][11][12] for both transmit and receive paths, while the second incorporates the W7ZOI termination insensitive, closed-loop, IF AGC amplifier [13][14][15] in the receive path, and an open-loop, variable gain, W7ZOI termination insensitive amplifier (TIA) [16][17] in the transmit path. The variable gain amplifier has been implemented with an open-loop, AGC amplifier to which has been added an onboard gain adjustment trimpot. This trimpot is used during module tests. It is removed during transceiver integration and is replaced by a control panel potentiometer that sets the transmitter drive level.
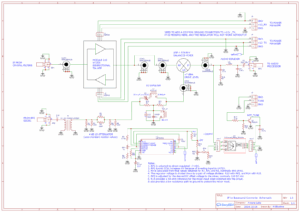
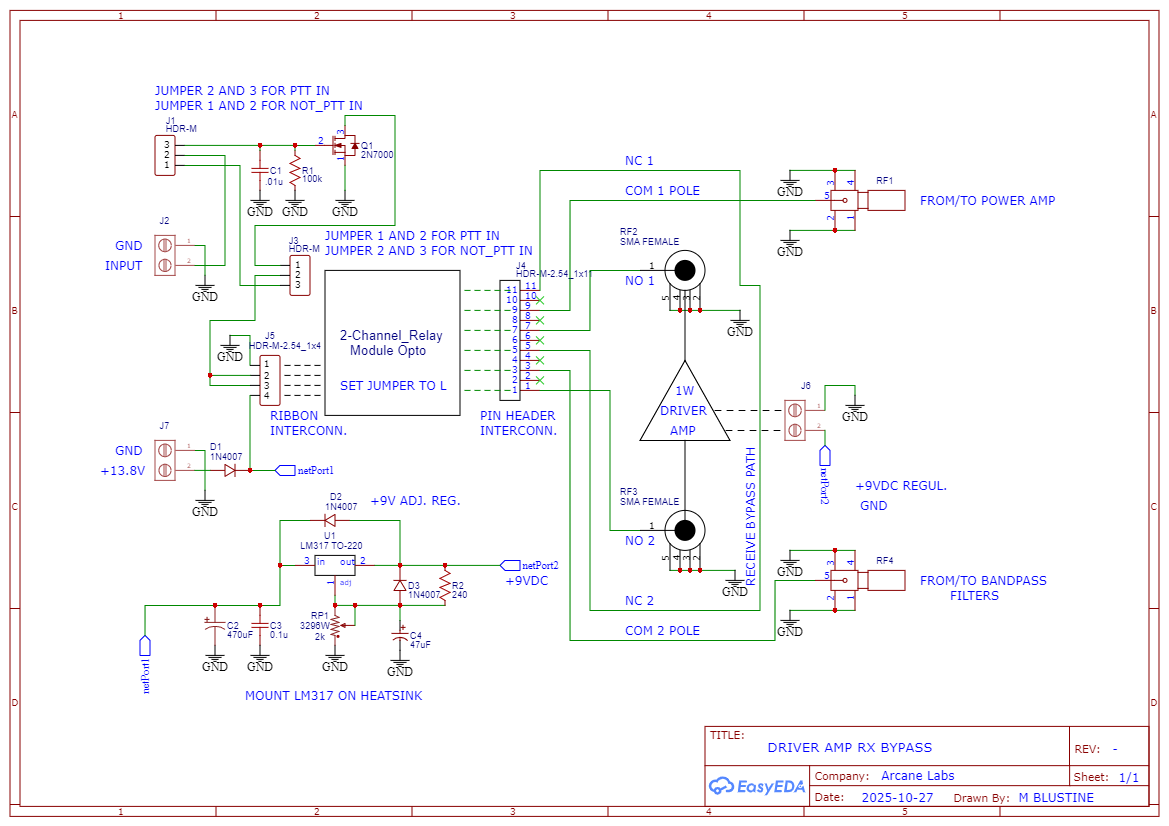
Figure 1. The IF to Audio Baseband Converter Schematic Diagram. This module employs a fixed gain W7ZOI bidirectional, termination insensitive amplifier (TIA) for receive down-conversion from 9 MHz IF to audio baseband and from audio baseband to 9 MHz IF for transmit up-conversion. A low-noise LM723 voltage regulator is part of a millivolt, DC, onboard power supply. Its purpose is to unbalance the ADE-1 balanced modulator so that a carrier may be injected during transmit for antenna tuning.
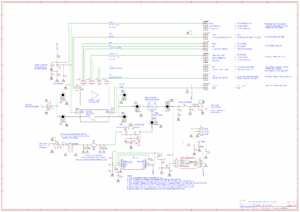
Figure 2. The IF to Audio Baseband Converter with Receive AGC Schematic Diagram. This module employs a W7ZOI Termination Insensitive Amplifier (TIA) with closed loop AGC for receive down-conversion from 9 MHz IF to audio baseband. A W7ZOI Termination Insensitive Amplifier (TIA) with open loop AGC is used for transmit up-conversion. A low-noise LM723 voltage regulator is part of a millivolt, DC, onboard power supply. Its purpose is to unbalance the ADE-1 balanced modulator so that a carrier may be injected during transmit for antenna tuning.
What is a Balanced Modulator?
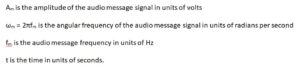
In the time domain a SSB signal containing the message is generated by multiplying a time dependent audio message signal by a time dependent IF carrier signal in a mixer used as what is called a balanced modulator. The audio message information is injected into the IF port of the balanced modulator while a local oscillator (LO) signal is injected into the LO port of the balanced modulator. What results is a double sideband suppressed carrier signal in the time domain. There are other methods used to produce SSB signals, but we will limit this discussion to the use of a double balanced mixer for this example. The problem could also be described in the frequency domain, but that solution will not be presented at this time. For sake of example, we neglect higher order, odd harmonics of the LO signal because the LO signal is a square wave. Also, for simplicity, we will neglect the phase terms that accompany each of the signals.
In order to achieve the best possible carrier cancellation in a double balanced mixer used as a balanced modulator, care must be taken to ensure that all of the mixer ports have been terminated in 50-ohms. It is also essential to drive the mixer at its required signal level. Once these requirements have been implemented in the design, the signal leaving the balanced modulator will consist of two sidebands, an upper one and a lower one. The carrier will have been greatly suppressed.
The time dependent, equation for the output of a balanced modulator may be derived from two expressions; the first,
 is the time-dependent audio message information that is injected into the IF port of the balanced modulator,
where:
 It is important to remember that the time-dependent audio message signal may or may not be a single sinusoidal frequency. For example, voice is quite complex and contains many frequency components. For simplicity here, though, it is defined as a single frequency.
while the second,
 is the time-dependent IF carrier signal that is injected into the LO port of the balanced modulator,
where:
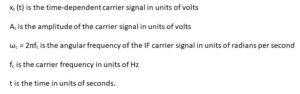 For this discussion the assumption is made that the IF carrier signal frequency is much greater than the audio message signal frequency. Multiplying the audio message with the IF carrier, we have for the double sideband suppressed carrier (DSB-SC),
 Substituting, we have,
 We may recall from trigonometry that the product of two cosines is just,
 Substituting, we have,

This equation is comprised of two terms, where the first term,
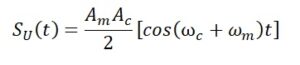 is called the upper sideband because the output frequency is higher than the carrier.
We know from trigonometry that,
 Thus, for the upper sideband, we have,
 where the minus sign is correct and is the result of trigonometry.
The second of the two terms is,
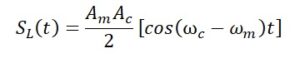 which is called the lower sideband because the output frequency is lower than the carrier.
We know from trigonometry that,
 Thus, for the lower sideband, we have,
 where the plus sign is correct and is the result of trigonometry.
These two sideband equations may be combined in compact form as the double sideband suppressed carrier (DSB-SC) signal,
 where the minus sign represents the upper sideband, and the plus sign represents the lower sideband, however counterintuitive it may seem.
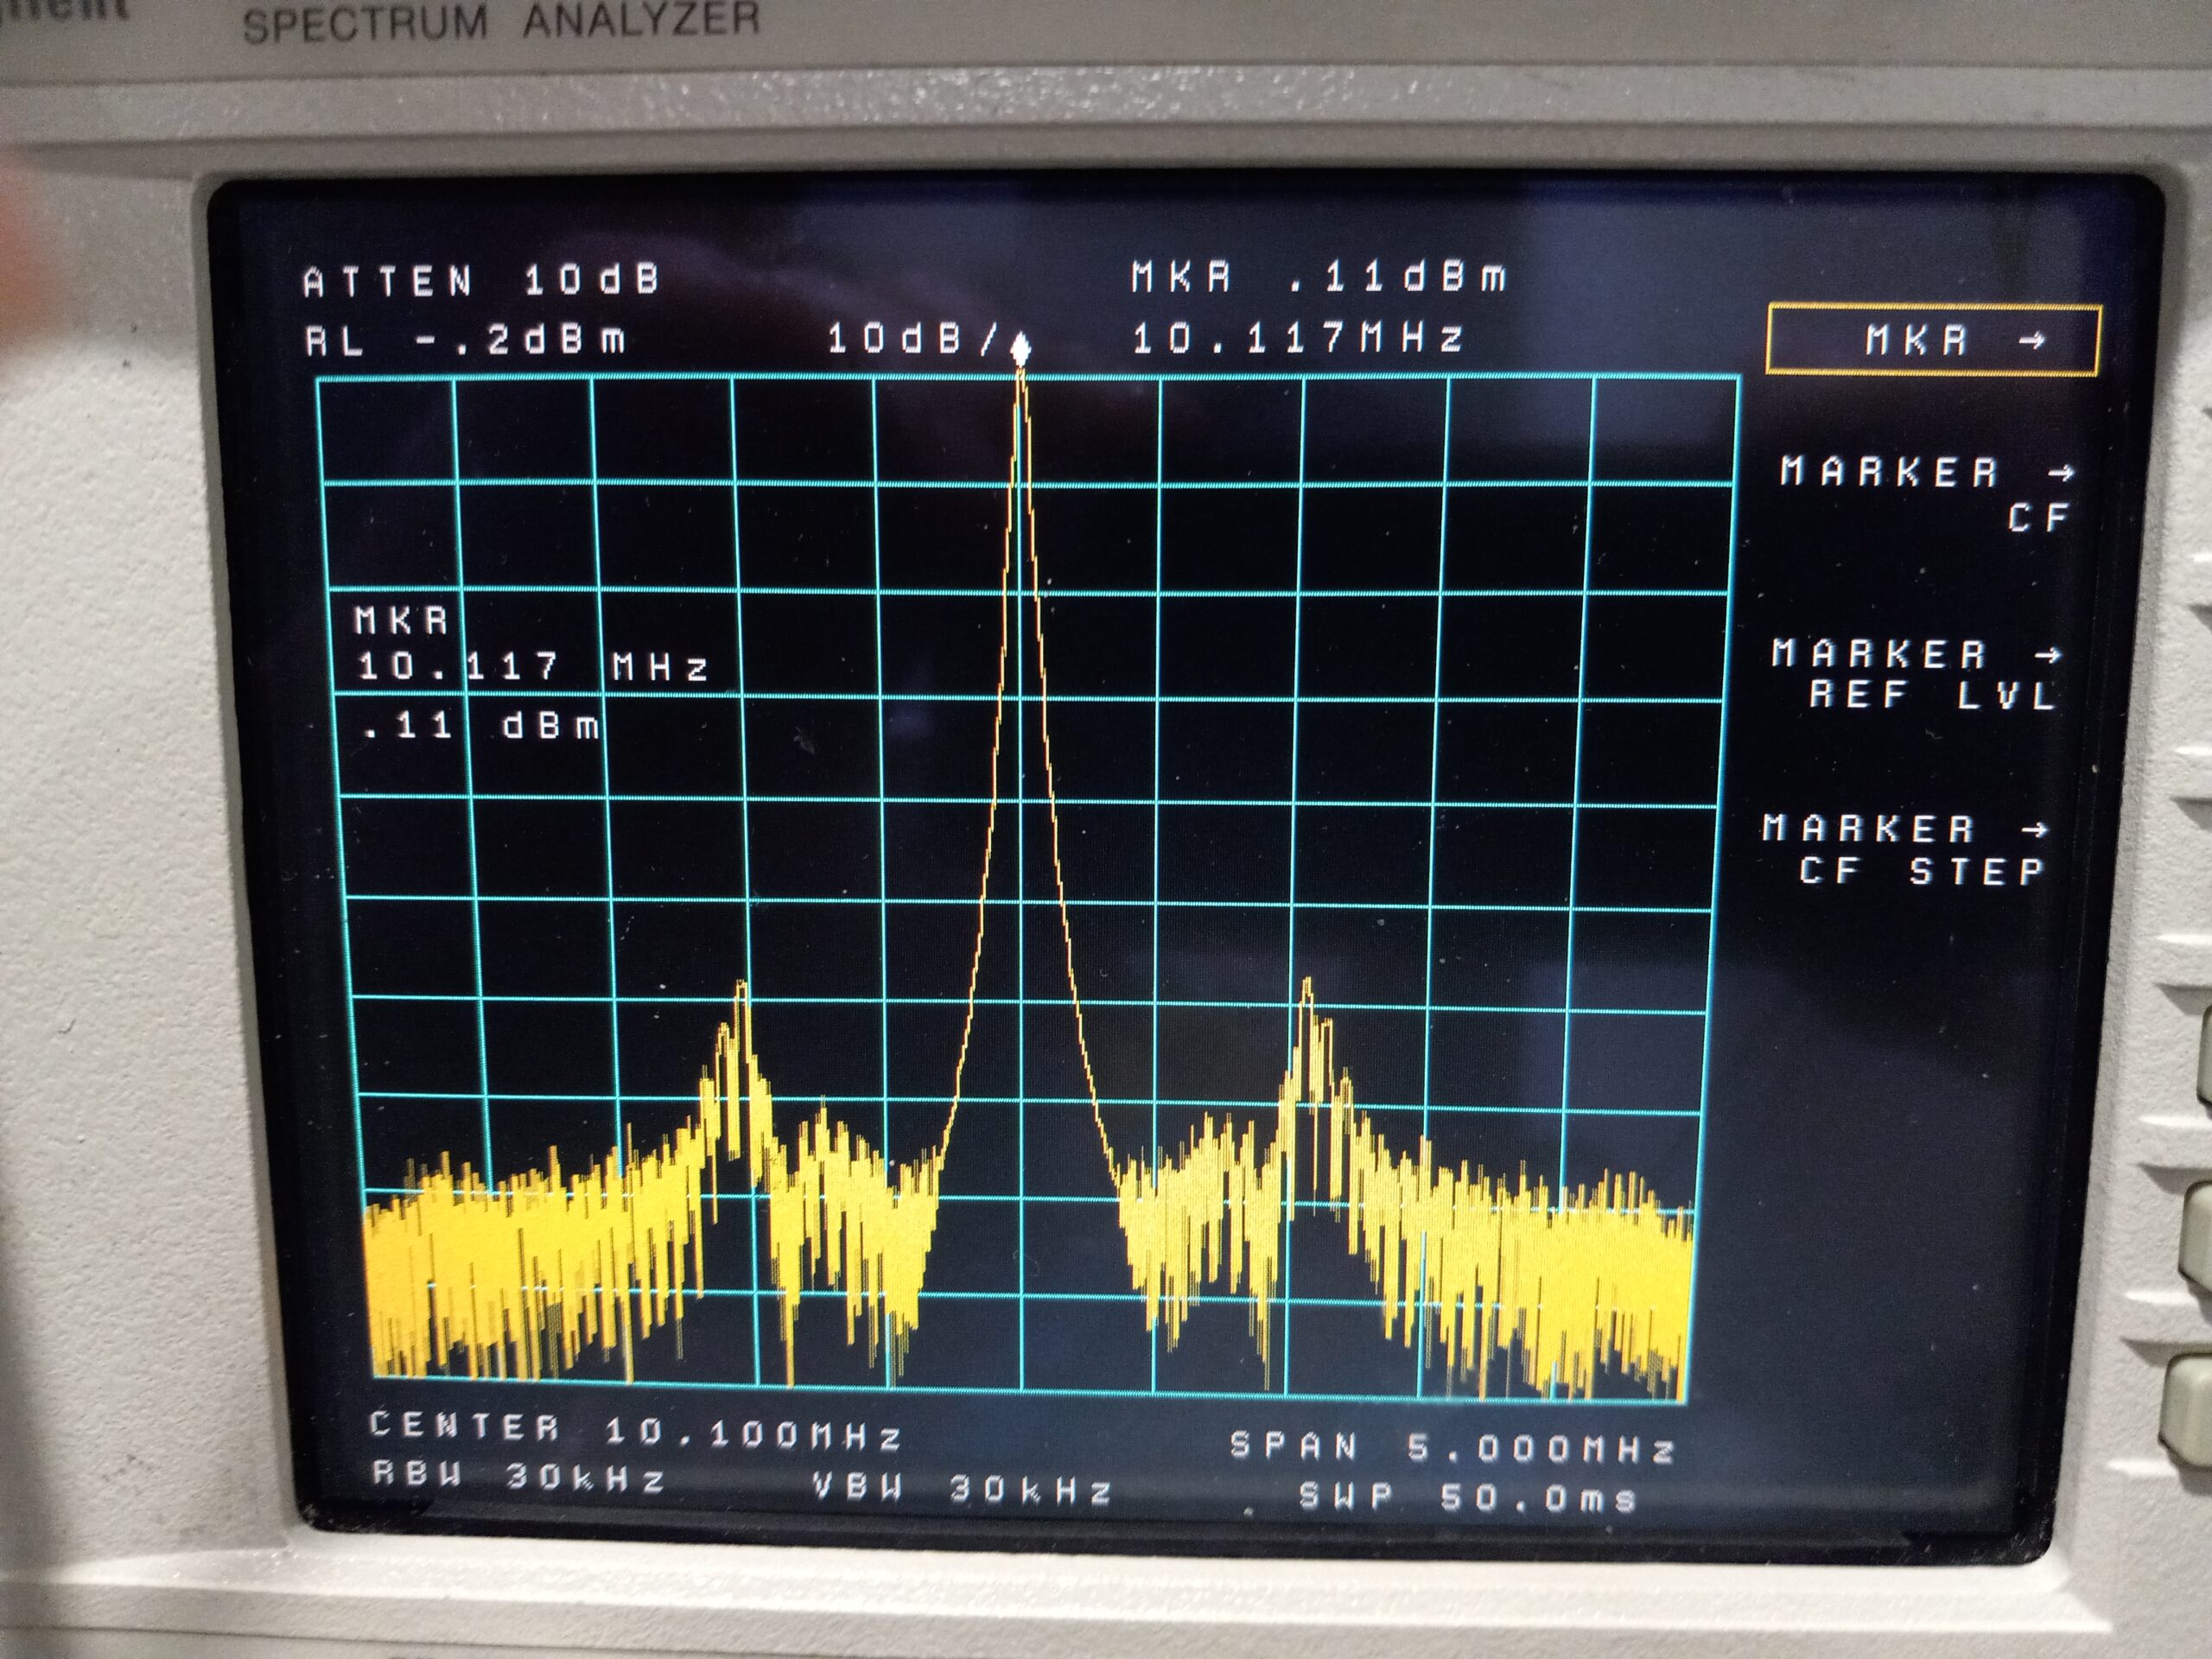
One might ask how one of the two sidebands is selected for transmission? The answer comes in the form of a very narrow (of the order of 2.6 kHz wide) crystal bandpass filter [10] centered somewhere near 9 MHz. If upper sideband transmission is desired, that frequency is shifted downward so that the upper sideband sits in the passband of the crystal bandpass filter. If lower sideband transmission is desired, that frequency is shifted upward so that the lower sideband sits in the passband of the crystal bandpass filter. This is accomplished by shifting the LO frequency to the balanced modulator by a few kHz.
All of this requires some a priori knowledge of where the center frequency of the crystal bandpass filter is located. Once known, the audio message information may be shifted so that it is centered in the crystal bandpass filter passband for either sideband.
What is a Product Detector?
In this context a product detector is a demodulator used to recover audio message information from a SSB voice message signal. If a double balanced mixer is used as a product detector, a SSB signal enters the RF port of the mixer while a local oscillator beat frequency oscillator (BFO) signal is injected into the local oscillator (LO) port. When the listener tunes the receiver BFO frequency close to the carrier frequency that was removed prior to SSB transmission, the audio message information becomes intelligible to the listener. This presupposes that the signal is transmitted on upper or lower sideband in accordance with conventions used on the ham bands. It is important that hams work to the same conventions everywhere on the planet or the system will break down.
Product detection may also be described in a few trigonometric equations. This time we use the same double balanced mixer as a product detector. After passing through our crystal bandpass filter, the upper or lower sideband signal is sent to the RF input of the product detector. A BFO signal is injected into the product detector LO port to match the frequency of the carrier that originally generated the SSB transmission. Once tuned to the correct sideband, the output of the product detector passes through a lowpass filter to remove all of the remaining high frequency components, thereby recovering the message audio.
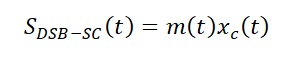
In the previous section it was shown that the DSB-SC signal may be represented by,
 This expression contains the message on both of the sidebands, where the carrier has been suppressed.
If we want to recover the voice audio message information, we select the appropriate sideband that has been transmitted based upon the ham band in use.
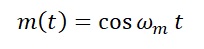
In order to simplify the expression appearing above without any discussion of the Hilbert transform, let’s make some simple trig substitutions, and we will dispense with any of the constant terms out front. Let’s represent the time-dependent voice audio message in this way,
 Furthermore, we can use a trigonometric identity,
 Transformations of this type are quite common in communication theory, but we will not dwell upon them.
These two quantities having been defined; we may write our equation for DSB-SC in this way,
 Now, suppose that we multiply the preceding expression by the same carrier frequency, presumably in the product detector, and we have for the carrier,
 where c(t) is the BFO carrier signal that matches the one suppressed during message transmission.
Then, having performed this operation; we will have recovered the modulating time-dependent voice audio message, where,
 and where R(t) represents the recovered, time-dependent message prior to filtering.
Multiplying through, we have,
 Again, invoking trigonometric substitutions,
 and,
and,
 which yield,
 This may be rewritten to show the carrier frequency instead of the angular frequency,
 The first term contains the time dependent audio message information while the last two terms contain the carrier frequency. The carrier frequency terms may be removed by lowpass filtering after the product detector with an audio diplexer to recover the time-dependent audio message.
Why Two IF to Audio Baseband Converters?
The reason that two discrete IF to Audio Baseband Converters were designed and built is twofold.
First, I wanted to fast-track the SSB radio integration task if trouble was encountered with the IF AGC circuit. This turned out to be fortuitous, and that is exactly what occurred. It took some time to de-bug the circuit.
Second, I wanted to be able to compare receiver performance with, and without, IF AGC. Differences in receiver dynamic range and sensitivity were anticipated.
Construction
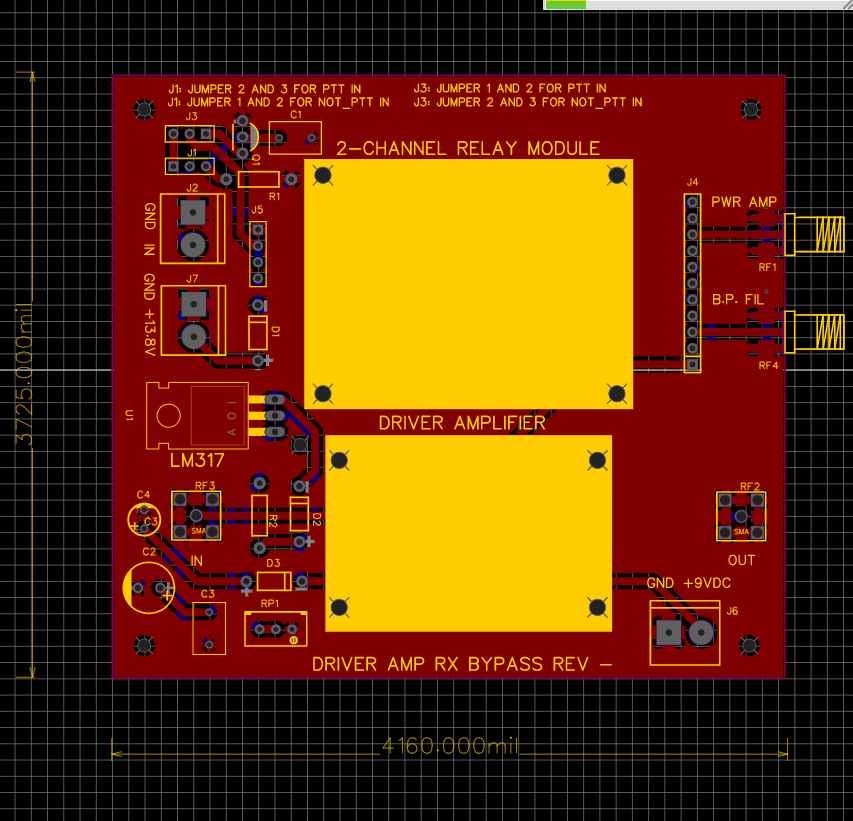
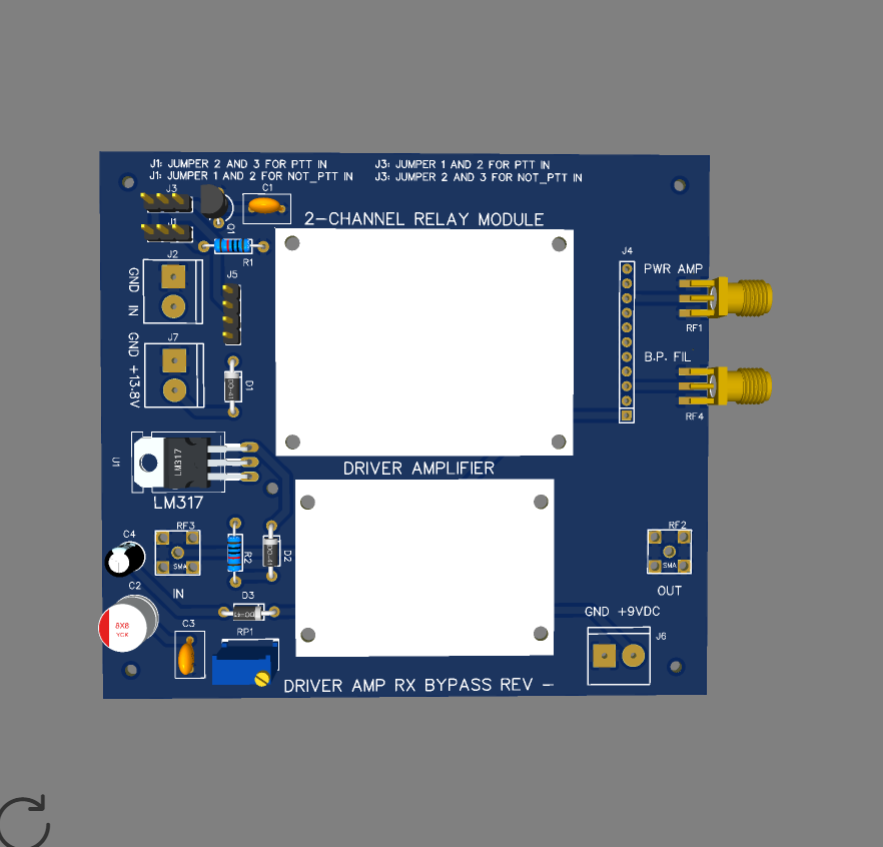
Both circuit cards were designed on EasyEDA [18] CAD software that is available for free download and use. PCB fabrication was completed from transmitted Gerber files by JLCPCB [19] in Hong Kong. Turnaround time was 10-days. In order to reduce the number of via holes on the circuit boards, 4-layers were adopted. The top layer consists of ground plane. Vertical SMA RF connectors on the surface of the boards put the ground plane to good use. DC and signal connections to the amplifiers and mixers are made via pin headers and DuPont wires as are visible in Figures 3 and 4. Each of the modules derives its input from a crystal bandpass filter [20] that has sharp skirt selectivity.
Several features are visible on each of the circuit boards:
· W7ZOI Termination Insensitive Amplifiers (TIAs) in use on both boards to present 50-ohms to the balanced modulator RF port on transmit and the product detector RF port on receive
· A Mini-Circuits ADE-1 mixer functions as a balanced modulator upon transmit and a product detector upon receive
· A transformer on the BFO port to transform the impedance level of the SI5351 Clock Generator to 50-ohms
· A pi-attenuator to adjust the BFO drive level to that required by the mixer
· An LO diplexer is used to present 50-ohms to the mixer LO port
· An audio diplexer is used on the mixer IF port to present a 50-ohm load to the IF port, and to filter out any RF appearing on the IF port upon receive so that the audio message may be recovered
· A low noise LM723 voltage regulator is used in a millivolt power supply configuration so that the balanced modulator may be unbalanced for carrier injection

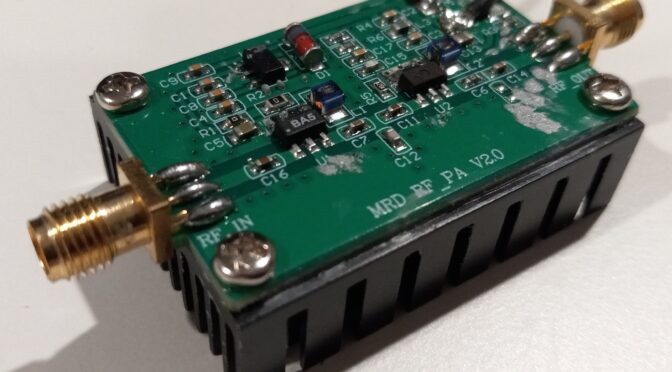
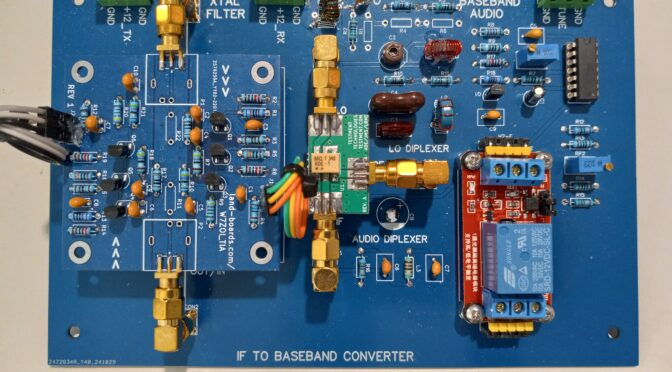
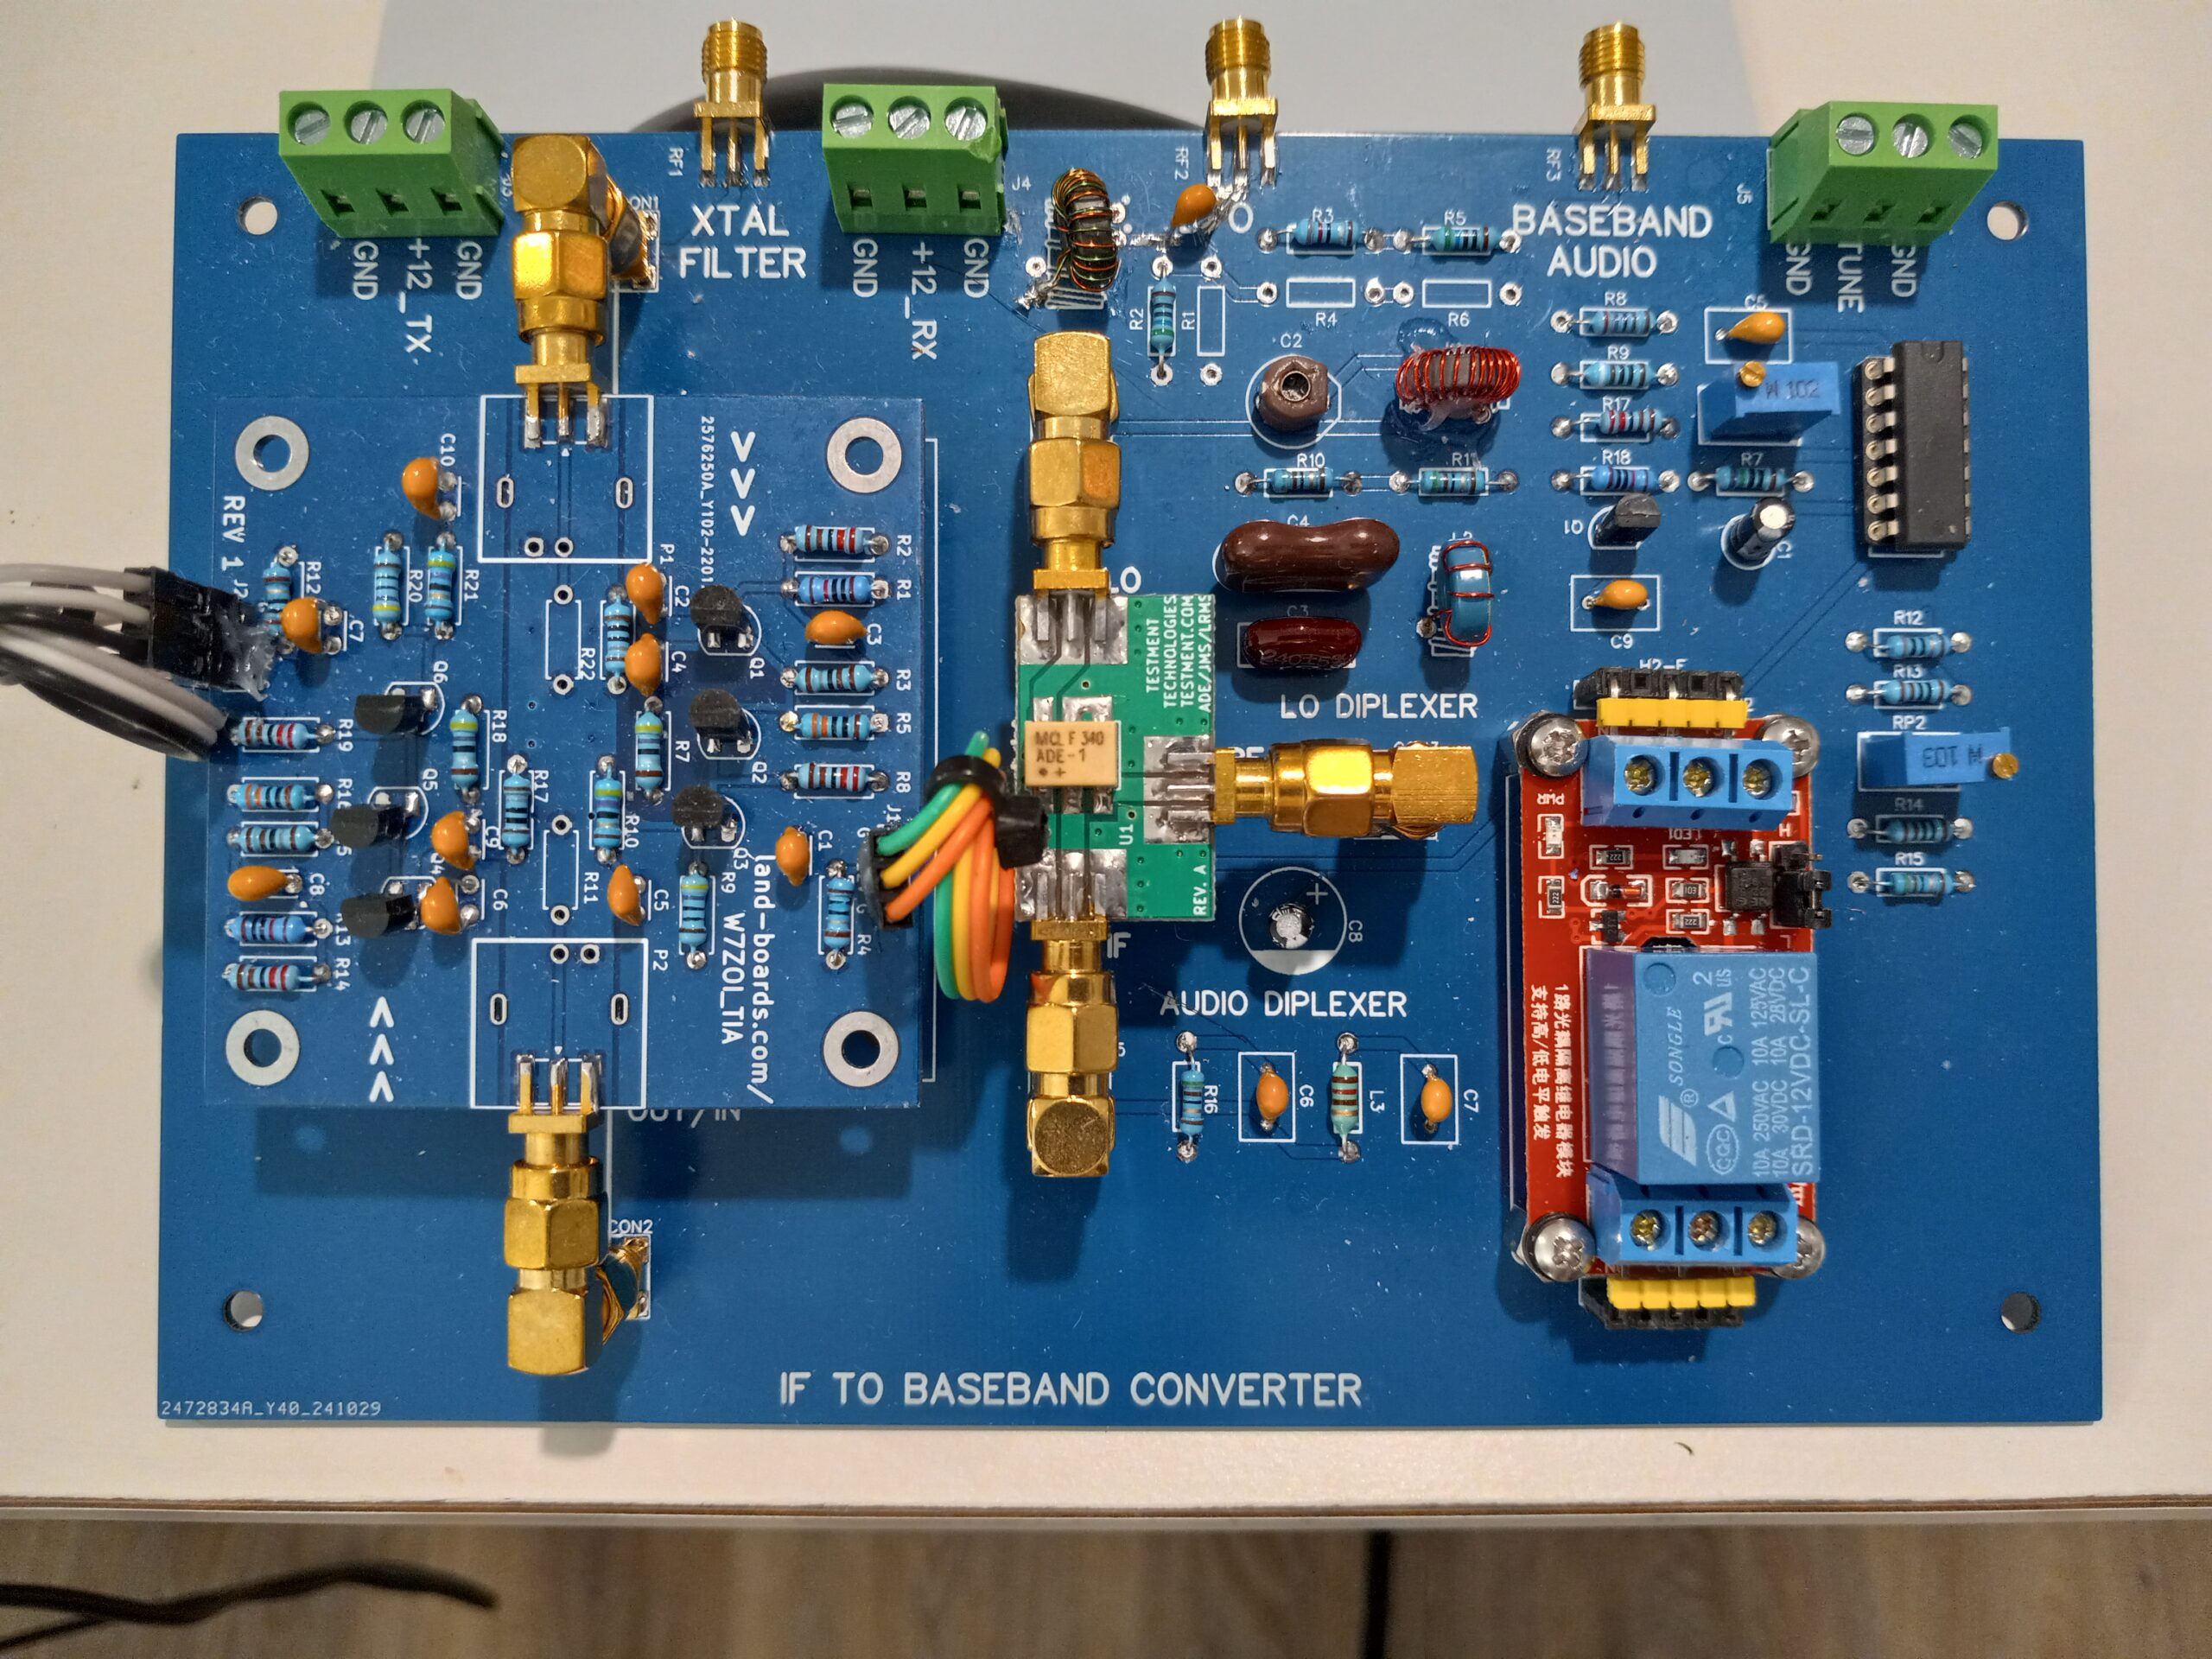
Figure 3. IF to Audio Baseband Converter without AGC. The IF to Audio Baseband Converter module without AGC consists of a W7ZOI bidirectional, termination insensitive amplifier (TIA) to the left, a Mini-Circuits ADE-1, +7 dBm level mixer at the center, and a millivolt power supply to the right. The mixer serves as a product detector for receive and a balanced modulator for transmit. The relay at the lower right switches 100 mV onto a 50 ohm termination at the IF port of the mixer to unbalance it. This serves to inject a carrier into the transmit path so that the antenna may be tuned to resonance. An audio diplexer is visible on the IF port. This serves to terminate the IF port in 50 ohms while providing a lowpass filter to pass the receiver audio. There is a transformer visible on the LO port of the mixer that serves to match the 76 ohm output impedance of the SI5351 clock generator used as the beat frequency oscillator (BFO) to the 50 ohms required by the LO diplexer and the ADE-1 mixer LO port. A pi-attenuator is provided between the transformer and the diplexer to drop the SI5351 level to +7 dBm.
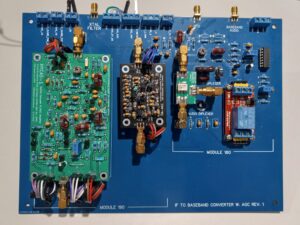
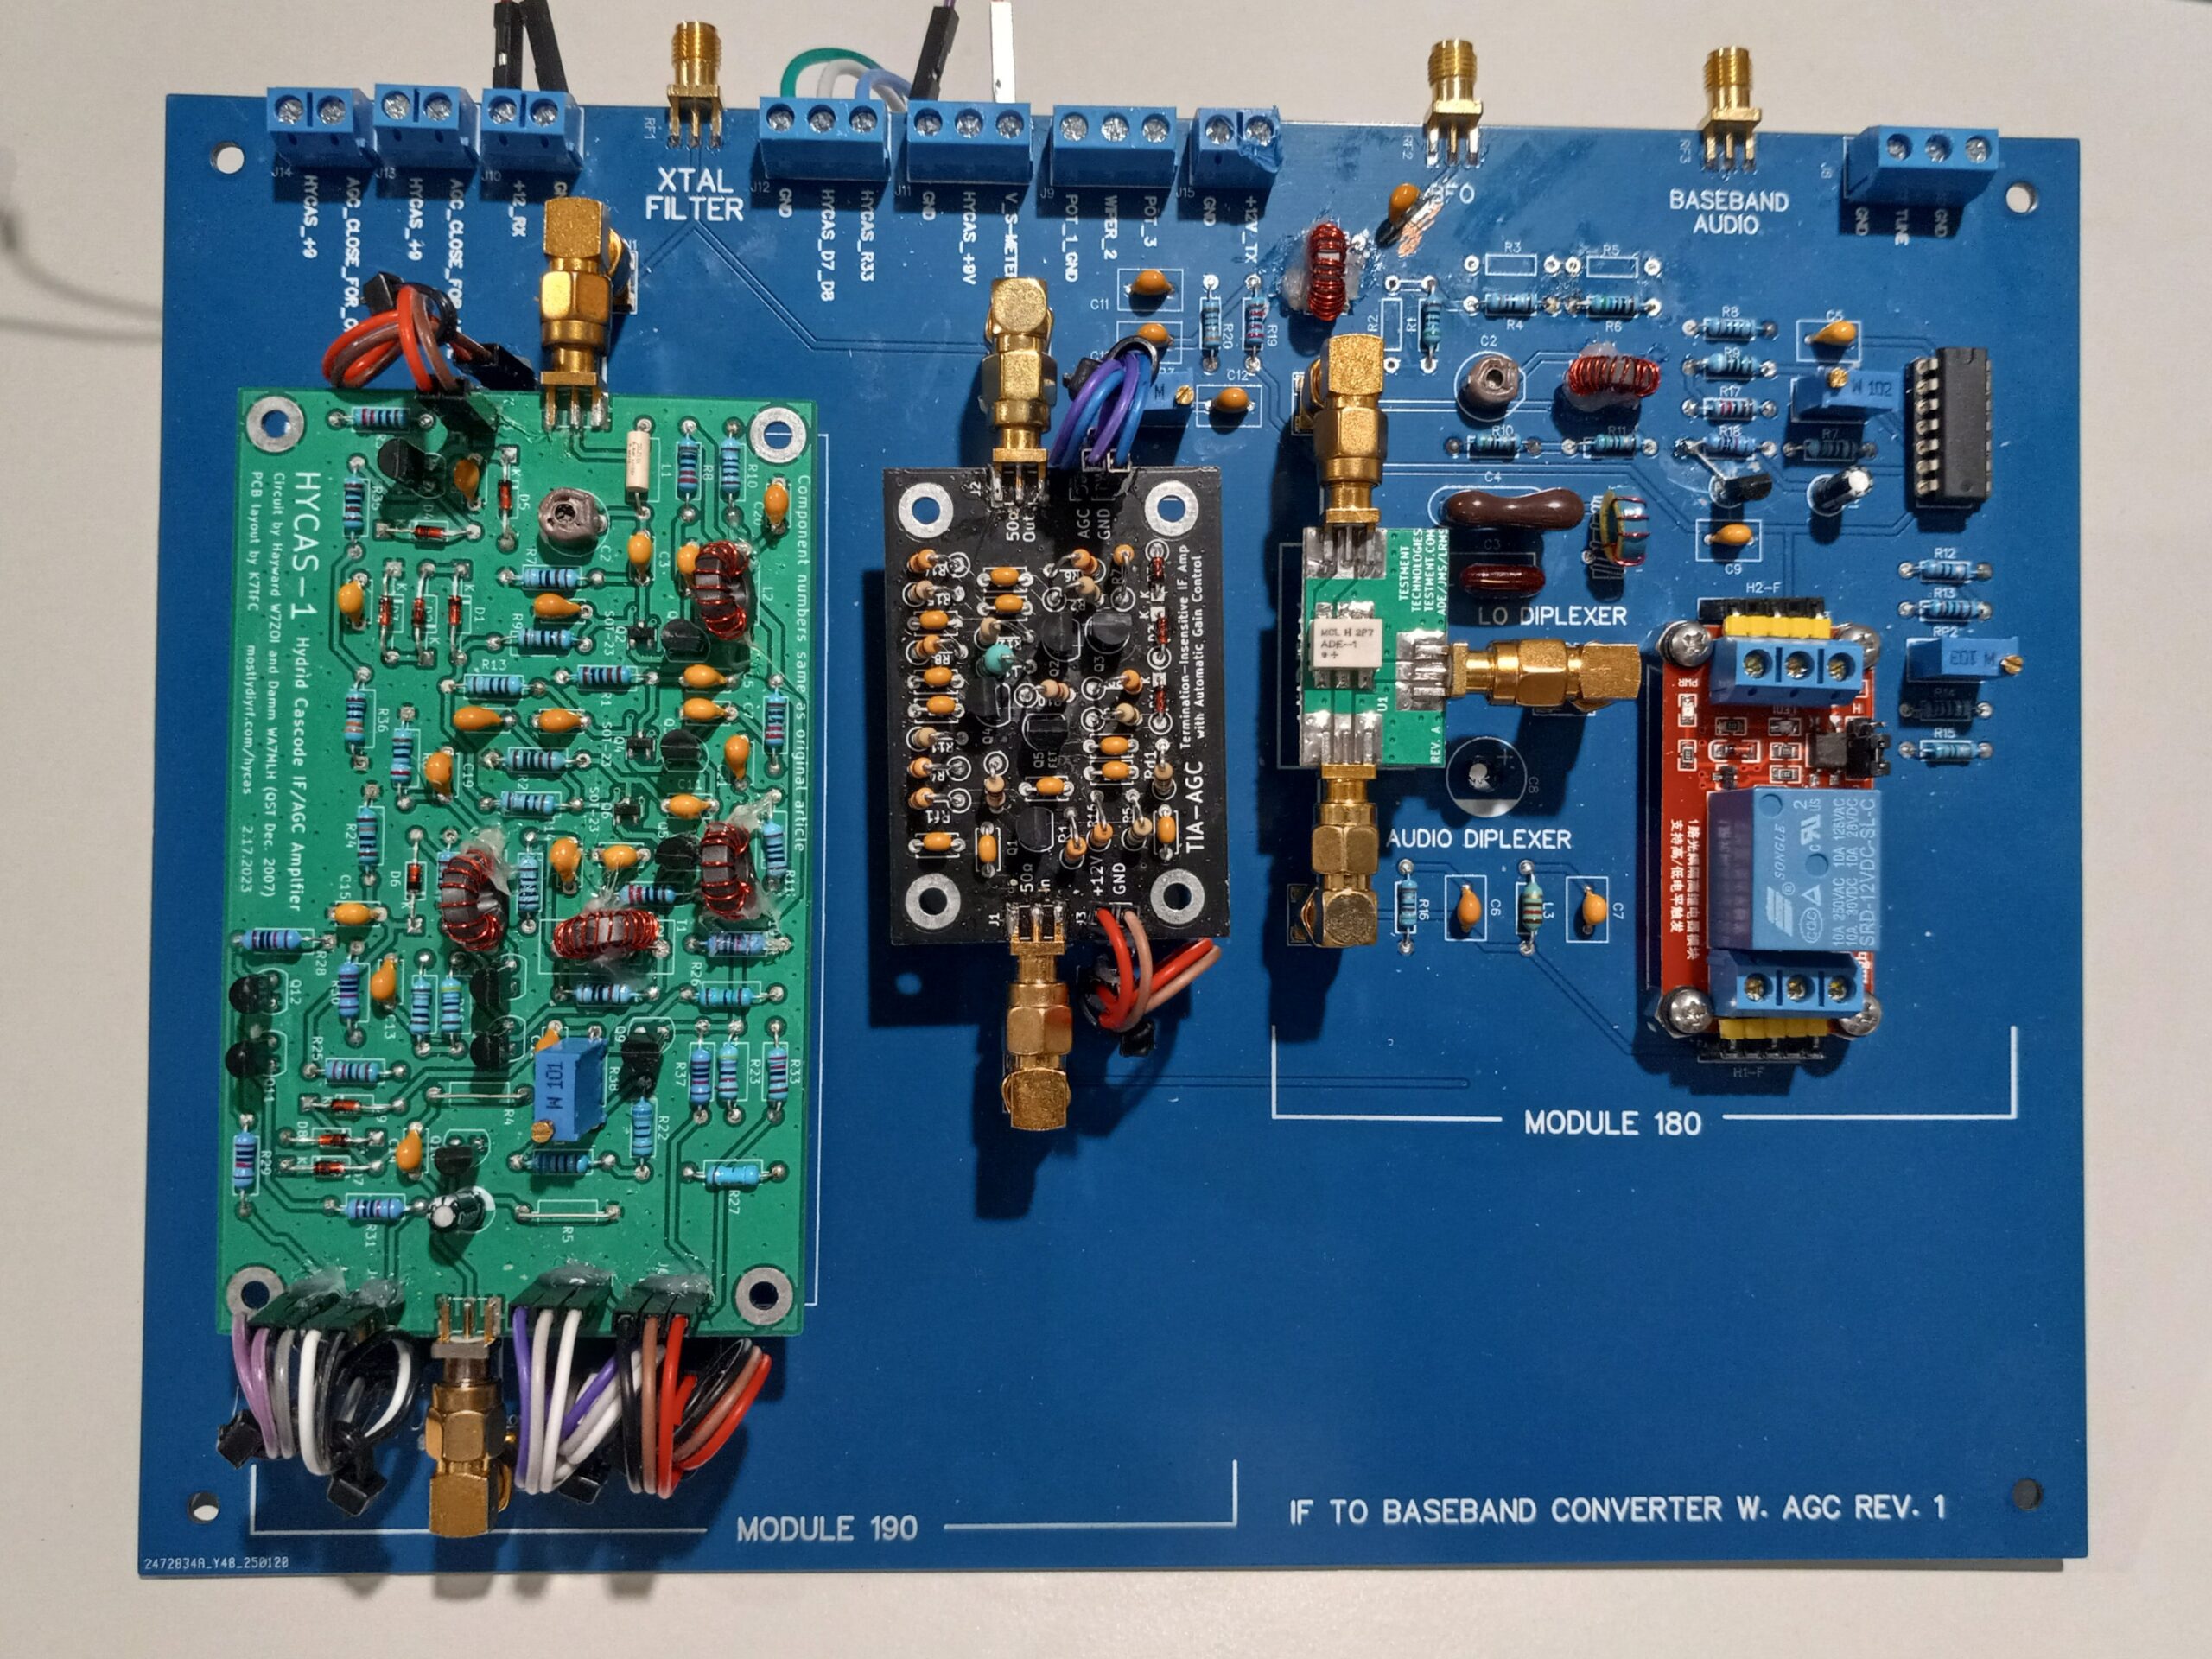
Figure 4. IF to Audio Baseband Converter with AGC. A W7ZOI termination insensitive amplifier (TIA) is visible to the left. It is used during receive only, and it operates with closed loop AGC. The AGC output voltage also serves as the S-meter signal that is routed to the Arduino S-meter input for display on a 3.2” TFT display. Another W7ZOI termination insensitive amplifier (TIA), set to fixed gain for test, is visible second from the left. It is constructed from an amplifier that has an open loop AGC input. A potentiometer on the AGC port is used to set a fixed transmitter drive level. The Mini-Circuits ADE-1 mixer, second from the right is used as a product detector on receive and a balanced modulator on transmit. The circuitry to the far right generates 100 mV that is applied to the 50 ohm termination on the IF port of the mixer. This serves to inject a carrier into the transmit chain so that the antenna may be tuned to resonance. The relay in the photo switches the 100 mV onto the 50 ohm termination on the IF port of the mixer. A transformer is visible on the LO port that transforms the 76 ohm output impedance of the SI5351 clock generator to the 50-ohms required on the mixer LO port. A pi-attenuator is located between the transformer and the LO diplexer to lower the signal level to that required by the +7 dBm mixer. An audio diplexer and lowpass filter provides a 50 ohm match to the IF port while allowing only audio to pass.
References
[1] Blustine, Martin, K1FQL, An RF to IF Converter for QRP SSB Transceiver Use, N1FD, 4 August 2025. https://www.n1fd.org/2025/08/04/transverter/
[2] Ibid.
[3] https://www.changpuak.ch/electronics/calc_16a.php
[4] https://leleivre.com/rf_pipad.html
[5] Blustine, Martin, K1FQL, Impedance Matching to an 8-Pole Quasi-Equiripple (QER) Crystal Bandpass Filter, N1FD, 21 May 2024. https://www.n1fd.org/2024/05/21/crystal-filter/
[6] Mini-Circuits, https://www.minicircuits.com/WebStore/dashboard.html?model=ADE-1
[7] Lewallen, Roy, W7EL, An Optimized QRP Transceiver for 7 MHz, ARRL, https://www.arrl.org/files/file/Technology/tis/info/pdf/93hb3037.pdf
[8] Texas Instruments, https://www.ti.com/lit/ds/symlink/lm723.pdf
[9] Adafruit, https://www.adafruit.com/product/1743?srsltid=AfmBOopGfznYc8RKuumddbQzWwXY_d1ByQd07CqiPAZ_xqBDg2jOWuzv
[10] Hayward, Wes, W7ZOI and Kopski, Bob, K3NHI, A Termination Insensitive Amplifier for Bidirectional Transceivers, 26 June 2009. https://w7zoi.net/bidirectional_matched_amplifier.pdf
[11] Land Boards, A Termination Insensitive Amplifier for Bidirectional Transceivers. https://land-boards.com/blwiki/index.php?title=A_Termination_Insensitive_Amplifier_for_Bidirectional_Transceivers
[12] Tindie, A Termination Insensitive Amplifier for Bidirectional Transceivers. https://www.tindie.com/products/land_boards/termination-insensitive-rf-amplifier/
[13] Hayward, Wes, W7ZOI and Damm, Jeff, WA7MLH, The Hybrid Cascode – A General Purpose AGC IF Amplifier, QST, December 2007. https://www.ka7exm.net/hycas/hycas_200712_qst.pdf
[14] Hayward, Wes, W7ZOI, Regarding Circuit Boards for the Hybrid Cascode General Purpose IF AGC Amplifier. https://w7zoi.net/hycas-pcb.html
[15] Carney, Todd, K7TFC, Mostly DIY RF, https://mostlydiyrf.com/hycas/
[16] Hayward, Wes, W7ZOI, Adding AGC to a Termination Insensitive Amplifier, 27 October 2021. https://w7zoi.net/tia+agc.pdf
[17] Carney, Todd, Mostly DIY RF, TIA-AGC RF Amplifier. https://mostlydiyrf.com/tia-agc/
[18] EasyEDA. https://easyeda.com/
[19] JLCPCB. https://jlcpcb.com/?from=VGBNA&utm_source=google&utm_medium=cpc&utm_campaign=13059631621&utm_content=581194145188&utm_term=b_jlcpcb&adgroupid=118955305341&utm_network=g_&gad_source=1&gad_campaignid=13059631621&gclid=EAIaIQobChMIssG71-mZjwMVBjIIBR1NEDo_EAAYASAAEgKrzvD_BwE
[20] Blustine, Martin, K1FQL, Impedance Matching to an 8-Pole Quasi-Equiripple (QER) Crystal Bandpass Filter. Op. cit. https://www.n1fd.org/2024/05/21/crystal-filter/
Disclaimers:
The circuits included on these PCBs were sourced from a number of authors. This is a somewhat advanced and expensive project, and some prior design and construction experience is recommended before taking on a project of this magnitude. These circuit designs are provided for informational and educational purposes only and are supplied “as is” and without warranties of any kind, express, implied, or statutory. No representations or warranties are made regarding the accuracy, adequacy, completeness, legality, reliability, or usefulness of this information, either in isolation or in the aggregate. These circuit designs may contain links to or information based on external sources or third-party content. Endorsement and responsibility for the accuracy or reliability of such third-party information or for the content of any linked websites are not taken.