All posts by Randall Bashta

My wife and I just moved to Nashua last April from Acton, MA and we both retired in Oct. I worked for Bose as an Engineering Electronics Technician. I always thought about Ham radio and now I have I have the time to get involved. I took the Technician and General exam in December and got my license the first of January. I'm interested in teaching others about basic electronics - especially young people - as I used to train others at Bose and other companies. And I'm looking forward to help in other ways, too!

My Adventures into Digital Voice Radio

This article on Digital Voice Radio is intended for those new to ham radio but I hope that all who read these passages will enjoy and learn.

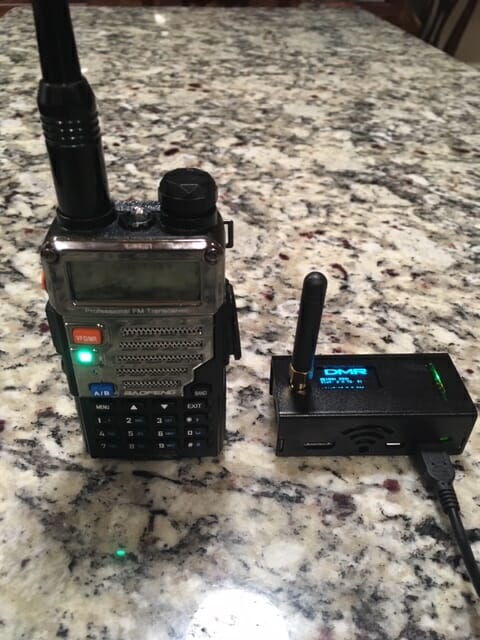
At a recent Nashua Area Radio Society club meeting on Zoom, there was a fascinating talk about Digital Voice Radio – including the mediums known as DMR, D-Star, and Fusion (C4FM) radio, given by Brian Gudzevich, WO1VES.

During that hour, I heard more buzz words, terms, and phrases that I could count. It took me the following week just to look-up everything. But what I heard was quite something, a  way to contact people all over the world with the clarity of digital audio.

What intrigued me even more, is that a new ham –  someone just getting their Technician License – can get involved with this kind of technology rather easily and for not much money.

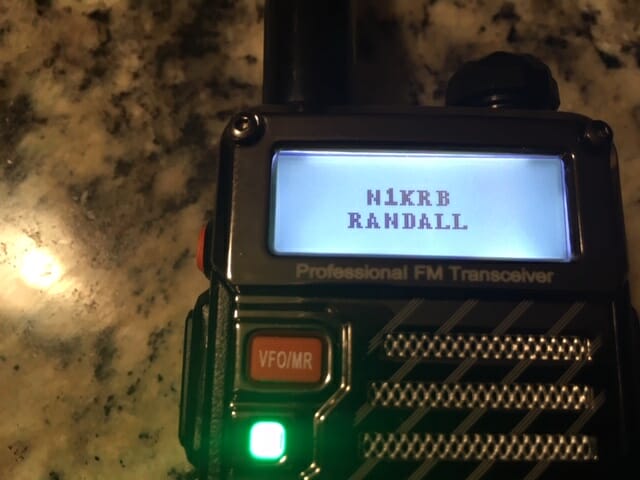
I remember what it was like for me, just two years ago, getting my first license and having only a Baofeng HT and making some of my first QSOs to the remote corners of New Hampshire and Vermont. Boy, did I feel hot stuff back then! I also tried EchoLink in the beginning and made some other interesting QSOs to the West Coast and parts of the UK. That was great, too!

But, from what I heard, the digital voice radio formats are like EchoLink on steroids. I wanted to give it a try.

Asking around, I heard that DMR – even with its various downfalls – might be a place to start. I found a Baofeng DM-5R Plus being sold for $ 55. This was an awkward radio to play with, but after time, it finally got it to work.

I was able to reach the local repeater in Hudson – K1MOT – and was able to hear a few voices while tuned in to the system with some success.

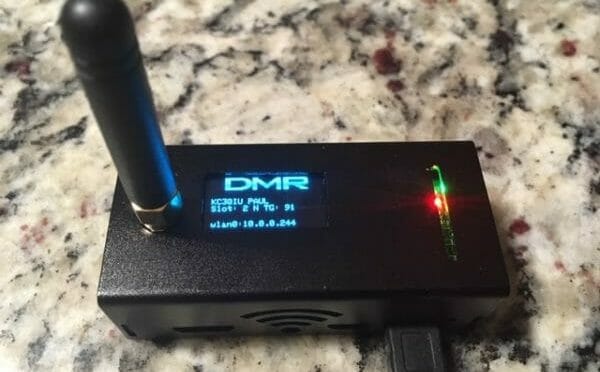
However, the best way to connect to digital radio and to the outside world is with something called a hotspot – a device that talks to the radio at one end and connects to the internet at the other. The hotspot I choose is what is known as a Jumbo, running Pi-Star.

Digital Voice Radio
DMR Hotspot

The basics of a DMR radio is that it is centered around the commercial radio technology, first developed by Motorola, which digitizes the audio and then divides that audio into packets. Those packets are sent and received over VHF and UHF bands.

To help make things work, each radio is required to have a ‘radio ID’, now issued by RadioID.Net. And for one radio to talk to another, the most common way to do this is to connect through something called a “talk group” which is like a virtual telephone party line. Anyone on the talk group can talk to another when they’re on the radio at the same time. Each talk group also needs its own ID number.

What also is required is that each radio needs to be programmed with something called a “code plug”. This is similar to the Chirp program used on HTs.  However, the code plugs on DMR are more like a matrix of data, setting up channels, contacts, talk groups, frequencies and so much more. It can be quite involved with trying to make sure all the information is imported into the right space. It is quite possible to screw things up … which I know first hand.

Using the repeaters, as mentioned, are rather limited as they only handle a small number of talk groups. The common complaint with the repeater is that it is hardly worthwhile because too few people are using them. However, a hotspot, with internet access at home,  in a car, or from a cell phone, can give you unlimited possibilities for chatting with others all over the world.

The first morning I got on the air, I overheard a fellow in Florida talking with someone in England. And then, I got on the air to talk with someone in Ohio and then Illinois, all with the clarity of digital signals. No QRN could be heard. It was quite something.

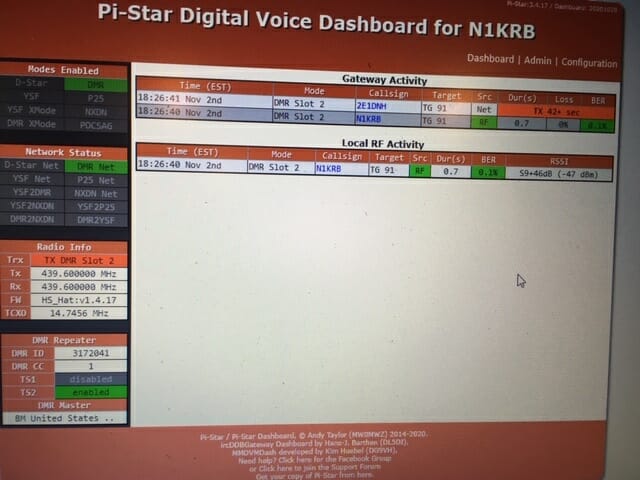
The one other thing I found interesting with DMR – with the Pi-Star hotspot –  I could log onto its ‘Dashboard’ and get an instant read-out of who else is on the talk group. Can you do that on HF? Maybe someday – maybe!

Digital Voice Radio
Hotspot Configuration Screen

And like I said, the whole experiment of trial and error cost less than $125 for the radio and the hotspot. Not great quality stuff but it worked and I was able to get a taste of this technology.

It is dizzying with the number of things available to anyone in ham radio – even for the new ham – and digital voice is just another exciting aspect of this ‘hobby’.

I would be interested in your experience with DMR. And who knows, I may try one of the other digital voice radio formats soon. Stay tuned!

73 Randall, N1KRB

The Sound Card

The Sound Card and How it Works

For a ham radio operator trying to work the digital modes for the first time, half the battle is installing the software and learning how to make it work. The other half of the battle is installing the Sound Card,  making all the right adjustments, and trying to make that work successfully. However, if you have one of the newer ICOM, Yaesu, or Kenwood radios, that struggle is almost eliminated as they have their sound cards built-in.

But, if your transceiver doesn’t have one, you’ll need to come up with something that takes the audio from the computer and run it into the radio; and then from the radio and back into the computer.

Basic Sound Card with Dongle

As shown above, the cheapest way to deal with this is to buy a USB audio dongle from eBay for about $ 3 and then a sound card kit for about 10 bucks. And finally, you’ll need to purchase a few 3.5 mm cables to connect from the dongle to the sound card. Then the fun begins, trying to figure what cable goes to where.

Inside the Sound Card

Essentially, a sound card is a device that takes the audio produced from the computer, matching the impedance between the computer and the radio and attenuating the signal considerably. Otherwise, the audio signal would be too strong for the radio to work properly, overloading the distorting it. Likewise, when sending a signal back from the radio to the computer, the audio has to be controlled and the impedance matched between the two pieces of hardware.

Typical Sound Card Schematic

The schematic above shows the audio coming from the USB dongle into a resistor divider network, at R3 and R4, which steps down the signal by 100 to 1. Then the audio goes through T2 for impedance matching. At the input and output to T2, there are capacitors used for shaping the signal going from the computer to the radio.

Going from the radio back to the computer, the schematic is similar; it uses a transformer, T1, used for impedance matching.

On better sound cards, potentiometers are used for further adjustment for the inputs and outputs.

Some sound cards provide for the capability of operating the PTT circuit by taking the control signal off the DB 9 connector on the computer and sending it to an optocoupler on the sound card. This is used to separate any difference of potential which might exist between the two pieces of hardware.

A Better Solution

Signalink USB

Of course, the easiest way to deal with this is to purchase something like the Signalink USB card from a supplier such as Ham Radio Outlet for about $ 125. The advantage to this card is that it plugs directly into the USB connector on your computer – eliminating the USB dongle –  and then connects to the radio with a special DIN connector at the other end. Also, this card has individual controls for TX, RX, and Delay.

Final Adjustments

Enough can’t be said about the need to make sure the right audio levels are set for the inputs and outputs at the computer and the radio. If the audio is too strong going into the radio, your transmission will distort, making QSOs harder to get. And at the other end, if the input signal is not at the proper level to the computer, the software will not be able to pick up the incoming sound.

My hope here is that with a little understanding of the sound card and what it does, this will make your next QSO on one of the digital modes as smooth as possible.  With some trial and error worked out, your next contact will be a lot easier. 73

Randall N1KRB


Exploring Winlink

Emailing on HF

If your internet goes down or you lose cell phone connection, how do you get important emails to the outside world? Winlink provides this capability! A must for groups like ARES.

With Winlink, all you have to do is download the program to your computer; then connect the transceiver to the computer with all of the interfacing hardware, and then write your message within the Winlink program and hit ‘Send’.

Sounds easy enough?

When you hit Send, your computer will sound like a dial-up modem from the  1980s, as the computer and your radio connect to an HF station and the email is sent. Once the message is received, it is sent the rest of the way via the Internet to its final destination or stored on the Winlink server until retrieved by the receiving Winlink account.

Winlink - The Main Page
The Main Page

Some Good News

The good news is that the program you need – Winlink Express – is free and rather easy to install.

The other good news is if your computer and transceiver are already set up for other digital modes – such as FLDigi and WSJT-X – you’re ready to go.

Winlink Hardware Requirements

The type of sound card you need is already installed in some radios like the ICOM 7300. Otherwise, try the Signalink USB from HRO for about $ 125. It has input and output controls on the outside of the case, making adjustments easy.

For Xiegu users, Xiegu sells the CE19 card for about $ 35.

And if you want to use the CAT function to control PTT,  use a standard 3.5 mm to USB serial transfer dongle.

However, if you are capable of using the VOX function on your radio, no CAT cable is needed

Setting Up Winlink

Winlink - EMAIL Page
EMAIL Page

After you’ve installed the program, it will open up to the main page. Go to the top-left of the page and click the ‘Message’ button which will open up the Email page. From there, write a Test message – with a proper email address, subject, and message – then click  ‘Post To Outbox’.

Go back to the top-left of the main page to the ‘Settings’ button and fill out all the required information – your call sign, your name, grid location, etc.

Then go back to the top-right of the main page and make sure the drop-down menu is on ‘Winmor Winlink’. And finally, click on the ‘Open Session’ button, just to the left. This will open up a whole new window which will require you to fill out more information.

Winmor Winlink Menu
Winmor Winlink Menu

The ‘Open Session’ Page

When you get to the ‘Open Session’ page, go to the upper left-hand corner to the next ‘Settings’ button. The first item to open up is the ‘Winmor TNC Setup’. Here you assign the audio input and output drivers to the sound card.

If you need to use the CAT function, go to the next settings’ item – ‘Radio Setup’ – where you will indicate what radio you’re using.

And finally, go to the top-center of the page and click on the ‘Station Selection’ button, to determine what HF station to use.  A list of all the stations available will appear, based on your grid location, with those highlighted in Green as the best choices.

Winlink - Station Selection Page
Station Selection Page

With all this said and done, go to the right-top side of the window and click on ‘Send’. A new window will appear – the TNC Card window – showing you all the handshaking going on as the software starts to search for the station and sending the message. When completed, the email sitting in the Outbox will be gone.

It does take a few minutes for all of this to happen, so you have enough time to get a cup of coffee while you’re waiting.

This has been a quick description of how to set up Winlink. There is a lot more information on YouTube and other Internet sources if you need it. I know I did.

From my experience, it took some trial and error before I got the audio inputs and outputs set up correctly. Also, I needed to find the proper setting for the VOX gain.

And I also found the best station from New Hampshire to use is the one in Maryland, which required 50 watts to reach it.

But, now that I’ve done all of this, I  feel I’m ready for the big one to hit, knowing that I can get an emergency email out to the outside world …. only if I can remember all the steps.

Randall, N1KRB

Radio Amateurs Developing Skills Worldwide